Showing posts with label Family Time. Show all posts

Friday, August 12, 2011

Travels to Lincoln City Oregon


We just got back from a wonderful family vacation at the Oregon Coast(Lincoln City).


We stayed here. [My families' in-laws rent it out-3 bedrms, 2 bath, kitchen & laundry rm]Its only a couple of blocks away from the beach. So peaceful!


Auri found a Dead crab


Taidan was excited to play with the Dead crab


Aulina's Star Fish

I'm so glad we could take a break from "life", to soak in the goodness that has been created for us to enjoy.

*In one of my next post, I'll show some items we found to make some crafts. Pin It

Friday, July 29, 2011

JOY in Service

We took hold of the greatest SERVICE opportunity today.


Our friends [a few houses down] are moving back east. We are going to miss them. They are some of the most kind people we have come in contact with. Today the movers were packing up the last of their things.

The kids & I got our cleaning supplies(I buy my home friendly ones here) and headed down to do some cleaning.


I made these aprons awhile back to wear and hold their cleaning bottle & rag.
Tutorial to come.

I love the JOY that comes from helping others & seeing a Smile on their face. How Rewarding!
Pin It

Friday, May 6, 2011

WEED Buckets

Now that its warmer weather the Weeds seem to be in full bloom(oh wait, they're always in bloom!). So I don't have to pick all the weeds myself I usually give each of the kids a grocery sack to fill. Either the weeds are not fun to pull or the grocery sack is too big to fill up. My SIL enlightened me with a solution.


Dollar Store (DollarTree) Bucket


When they fill up the bucket they are done for the day. I'm hoping this will cut down on all the whining of "how many hours of weed pulling".


I figure we could all do this a couple times a week. If more weeds need pulling we might have to do it more often. Well see. Pin It

Friday, March 25, 2011

Family Names {Scrabble} Style


I was so excited when I found this idea. It is so CUTE!


I realized I had this left over door (to an entertainment center) that would serve as the frame.


I used my fabric ruler as a guide to line up all the tiles. Arrange all the tiles to form names of each family member. I found my scrabble letter tiles at the discount store in the game section but you can buy a full set here(amazon.com).


[Fabric Flowers are found on Heather's Etsy Shop]

We are so LUCKY to be apart of a Family.

Pin It

Monday, January 24, 2011

My Organized Home, Part 1- The Colorful Calendar

I don't know about you, but I would be completely lost without my calendar! I have four calendars to keep me on track... my Microsoft Office one in my laptop, one in my BlackBerry (which I regularly sync with Micro Office), one on my bathroom wall (which is only there for moral support- no writing), and my most favorite- our big family one in the kitchen. (I came up with this idea a few years ago after being frustrated that I couldn't plan ahead with my big "wipe-off" calendar.)


With four school-aged children and now working part-time, I would go insane without a visual display of our daily activities! And with 6 lives to keep track of, just a big calendar wasn't going to cut it either. I had to add some color so I could remember the "who's, what's and where's" at a glance; and it's been working wonderfully ever since! Here's what our February already looks like... Aaaaa! But since everyone has a different color, I won't be losing my mind too much.


And thanks to Heather, I have a new/improved frame for my big calendar. She made one for herself, then one for me. She's the best!! (I gave my other one to my sister.)


So my first 2011, Organized Home tip is that if you are tired of your wipe-off board with only one month at a time, or your family calender is just not big enough; don't fret! Go get yourself a desk calendar (for $5 at Walmart) and some pens in different colors (also cheap at Walmart- in a package with red, orange, green and purple). I swear by it!!

You can make a frame for it like my original, or one like my new one that Heather made!

Pin It

Monday, January 17, 2011

Our Strong Family, a Few Marbles at a Time

Building a strong family is not always an easy feat. It takes a lot of diligence and effort, amongst our busy life. There are some things we do as a family that are easier for us than others. There are some that we struggle to be consistent with, which was really bothering me! I really wanted to bring our consistency and diligence up a notch, and "raise that bar" a little higher in my home.

So a couple of months ago I decided that we needed to have a Family Home Evening lesson on what it means to build a strong family. We sat the children down and had them help us list the things that help us to be valiant, as a family. We came up with 5 things, then added one more ("work") a couple of weeks later...


We wrote these things down and gave them each a rating (between 1-10) of how we felt we were doing at the time. Our goal is to get a consistent 10pt rating on every one of these. Every month we evaluate our list to see if we are reaching our goal. (I'd like to create a graph to show our progress, so I left the old ratings up there too. Kind of a mess right now, but once I get that done we'll be able to clean up the board a bit. **Anyone have an idea of how I could make this into some sort of graph?)


I decided that we needed an incentive to help motivate and remind us of our goal, so I washed out an old Kraft Mayonnaise container and turned it into a MARBLE JAR. Every time we do something on our list, we put a marble into our jar. (Some of these are worth 2 or 3 marbles, depending on difficulty levels, etc.) We decided, as a family, on a REWARD for when we fill our jar to the top (which will be going out to dinner at Panda Express- the kids' fave, as a family).

This plan has been working beautifully in our home. We certainly haven't been perfect, but we are striving daily. I've truly noticed a difference in our home when we are diligently doing what is most important! Pin It

Wednesday, November 17, 2010

Teaching My Children Work, Gratitude and SERVICE- Part III

We did a Family Home Evening on SERVICE the other night. I started it off by showing and talking about what's happening in this picture (John 13:4-15)...

...and how the Savior was our perfect example of service. He came to this earth to serve, not to be served. (He has asked us to follow His example in verses 14-15.)

We discussed together WHY we serve others, how we FEEL when we do, and why it is important to think outward. We then went to the scriptures to read and discuss Matthew 25:40 and Mosiah 2:17.

Then we watched THIS awesome, short video clip...

We decided as a family that to serve others with true Christ-like love, we need not seek for the praise of "man". We know that our Heavenly Father is always watching.

So with that, we have a challenge this week to practice being the "Lord's Hands"...

We are to do secret acts of service for one another (when no one is looking) then leave a hand. If we tell or get caught, then it doesn't count. (I cut the hands out with the school's die-cut machine with my own paper.)


We also decided on a family service project that we will carry out for Christmas. Here is a list of links to ideas of family-friendly service projects...


One of these days I hope my children are going to really "get it". That they will grow up to be hard working, grateful people who want to serve the Lord. I'm trying to create experiences along the way for them to learn these things, and I hope it will all pay off!

Pin It

Tuesday, November 16, 2010

Teaching My Children Work, GRATITUDE and Service- Part II

I haven't done a lesson on GRATITUDE yet this year. But I found 2 different lessons on Lara's blog... Gratitude/Thanksgiving and Thanksgiving and Service and will do one of them for FHE next week. We do have a family tradition that we started a few years ago that we enjoy during the month of November...


And my 8 yr/old daughter came up with this idea all on her own the other day... (a paper chain counting down the days until Thanksgiving, havning written something she is thankful for on each link)


Sometimes I like to show my children pictures from the web of children/families in 3rd-world countries, and pictures of our soldiers that are over seas right now protecting our freedom.
Here are some great links that I've found...

Gratitude Tree (MyHeartandHome)
Thankful Jar (Little Birdie Secrets)

And some great video clips...
THIS one, and the one below...


And don't forget to check out all of our past THANKSGIVING inspirations as well. Check back tomorrow for what we did the other night for our FHE lesson on SERVICE!

Pin It

Monday, November 15, 2010

Teaching My Children WORK, Gratitude and Service- Part I

I LOVE this time of year! It's such a perfect opportunity to teach our children some very important values. I like to take full advantage of our Family Home Evenings in this regard, and it's so exciting to me!

I take a parenting class (that I've been taking on/off for the last 9 years or so cuz I just can't get enough of Carleen Tanner). And something she said recently in class is that some of the most important things we need teach our children is WORK, GRATITUDE and SERVICE; (and of course out of the 20+ class topics each year, 3 of them are on one of the above).

Anyway, so I figured I would start off this holiday season with a FHE lesson on WORK. I found a great lesson that was really effective on an awesome blog (that I recently found) called FAMILY HOME EVENINGS TO GO. Lara is so talented!


I have done and plan to do more lessons on WORK, and encorporate new things whenever we are ready for them, including allowance, money management, etc.
I also found some great articles on the web to read on the topic of WORK. Are you ready? There are lots!


Be sure to check back tomorrow for part II... Teaching GRATITUDE!
Pin It

Wednesday, July 28, 2010

Camping Scavenger Hunt For The Kids

We have a camping family reunion soon, and I was asked to make up a little scavenger hunt activity for all the children. The little cousins range in age from 2 yrs to 11, so I had to come up with something suitable for everyone. I went online searching for ideas, but just couldn't find exactly what I was looking for.

The little cousins can't read yet, of course; so I came up with my own scavenger hunt list with pictures that they could understand. Since this was just a family activity, I just Google Image searched for the pictures I would need.

HERE is a FREE copy for YOU. Enjoy!!
(Click on image to enlarge)

Anyway, I made this picture list, printed it off, then attached it and a pen to a paper bag. Fun!

*Here's a list of what's on my chart above
(row-by-row from top-to-bottom):
Pine Needle
Green Leaf (extra points for biggest and/or smallest)
Brown (dead) Leaf
Plant with Root
Leaf Eaten by Insect
Sharp/Rough Rock
Tree Bark
Smooth Rock
Pine Cone
Acorn
Wildflower (extra points if you know the name)
Wild Berry
??Treasure not found on list!??
Blade of Wild Grass
Tree Twig
Empty Pop Can
Broken Glass
Plastic Wear (extra points if find all 3)
Bottle Cap
Plastic Water Bottle
Coin
Bug/Insect ((include small 'sauce' container w/ lid from restaraunt))
Piece of Rope
Bullet Shell or Casing
Bird Feather

*Update: 8/5/10 FAB RESULTS! We did this with the kids at our family reunion this last weekend, and it went over very well! The only thing I wished I'd done differently was to add "or pop can tab" to the spot with "bottle cap" (pic below). Anyway, the kids had a blast searching for the items on their scavenger hunt lists. The older cousins (as well as parents/grandparents) got to help the younger ones. It was an all-around great activity for our camping reunion. My sis-in-law even gave out prizes at the end to the ones who found the most things.


Pin It

Friday, March 26, 2010

Personalized Book of Mormons

Can you tell I love to personalize things? I think it makes each family member feel so special. In our family we read the scriptures in the evening before the kids go to bed. We keep them in the living room for easy access. We read 1 page (each of us reading about 2 verses) and it seems to be just enough to keep attention while yet, still being uplifted. So we all know who's is who's we personalized our Book of Mormons.

Just hold all the pages together and use stamps to stamp family members name(and any other designs).

Since we only read 1 page sometimes we forget what side we are on so I made these bookmarks with our Family Mission Statement and whatever side the Statement is facing, is the side we need to read. This has saved us so many times. {Not that its a bad thing to read read the same page}. At the bottom of the bookmark we each signed it and put our "pinky" print. (we do "pinky promises") Pin It

Thursday, March 18, 2010

Family Voting Box

There are times in our family where we need to vote on a decision. I found this tin can bank at Target last year after Valentine's day filled with chocolate money. I didn't have any plans for it until now . . . our family voting box.

Before . . .


To cover the face of the box I cut a piece of chipboard and fabric. Glued it together and put a frame with some fabric stripes. Then labeled it with our initial and "vote here" labels.


After . . . Pin It

Monday, March 15, 2010

Family Cheer, Song and Mission Statement

Here is my family's Cheer and our Family Mission Statement (a copy kept in our FHE binder so we can go over it and memorize)... (click on image to see better)

This is how I have our mission statement displayed in our home...
Our special family song is the well-known primary song, "Families Can Be Together Forever" which we always sing as the closing song for FHE. (this idea from my dear friend, Rebecca J)


Our motto is not on display, but we always say "The K_____ family stands for truth & righteousness!" (If we ask our children what we stand for, they will say "truth & righteousness") Pin It

Thursday, March 11, 2010

Family Traditions

Since the beginning of this year, Heather and I have decided to focus our posts on a different theme each month. March's theme is on Family Togetherness, so this is why we have shared our FHE charts and some fun family games and traditions.

James E. Faust, May 1983, said:
"Develop family traditions. Some of the greatest strengths of families can be found in their own traditions." (found through Carleen Tanner's parenting class outline)

Here are the reasons we must create family traditions: (as taught in the wonderful parenting class by Carleen Tanner)

We ALL have these basic human NEEDS:
1. A need to BELONG
2. A strong sense of IDENTITY
3. ACCEPTANCE by others
4. Emotional & physical SECURITY

Family Traditions can:
1. Bind hearts & give fam. members a sense of identity
2. Connect family members to heritage
3. Remind family members what they stand for
4. Acknowledge & celebrate important events in the lives of fam. members
5. Give a sense of security & continuity
6. Cement people together as a family unit

TRADITIONS are so important to me and my family, and SO MUCH FUN to create and implement as something special and unique to US. I hope you will share some of your special family traditions with us as well! Stay tuned... On Monday I will share with you my family cheer/song/motto and mission statement! ♥ Pin It

{Our} Family Motto


We love our Family Motto Board because we came up with it together. We each took our beginning initial {the funny thing is that it actually spells something} and decided what it would stand for and what we wanted to aspire to. President Hinckley's "Be's" were a great inspiration. I know this will unite our family because we have the same goal to be. . . . . . Worthy, Humble, Artistic, Athletic, Achieving, and Teachable.


1-I first spray painted the board Black then Cream. Then I used the negative of a vinyl piece as my template.


2-Then I sprayed painted the lettering with Dark Brown.


3-I sanded the whole thing down to give it that "aged" look (even over the lettering). Pin It

Thursday, March 4, 2010

Ang's FHE Board & Wheel

Isn't Heather's FHE board awesome? Everything she touches turns out absolutely beautiful. She is so lucky to have a vinyl cutter, and let's her creativity go crazy with it! I do not have a cutter, but I get by okay without.

Here is my FHE board...

I created this wheel about 3 years ago, and it has worked out wonderfully for my family!! I ALWAYS use clipart for all my charts, because it helps the little ones who can't read yet. Hence the reason I created this one. It's made out of cardstock, laminated, and has magnets on the back for sticking up on the fridge or whiteboard (as is above). And it's totally easy to make!

Here's how:
First grab the right supplies, including 12x12 cardstock (can use 8 1/2x11 for the top one).

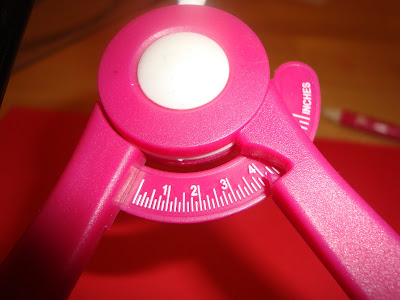
1- Draw circle with this tool (forgot what it's called). I set it at 4 inches for the top (smaller) circle. Hold the tool in place with one hand and turn paper around with other hand. *Mark where you had the center-tip of tool!

2- Now use the protractor and place the center exactly over the dot in the middle. For 6 sections, put small guide marks on "0" and "60", then the next "60" and next "0". Then rotate the tool and be sure to measure/space between the 60's and 0's.


3- Now you are ready to use the ruler and connect the dots to make your 6 even sections.

4- Cut wheel out along the outline of the circle.

5- REPEAT all steps for the larger circle, this time setting your circle-making tool at 1/2 inch bigger than the smaller one (mine was set at 4 1/2 for the bigger one).

6- Look through old Friend magazines for cute illustrations to cut out and glue on. (You might have to color-copy to resize the picture.) There is also some really cute clipart that you can find on Sugardoodle.net.

7- Now label each section by either typing/printing/cutting out/glueing on the words, or vinyl lettering, or just writing the words under each illustration. *Also write family members' names on the bigger (bottom) wheel.

8- Laminate!! Then poke holes in middle of each circle. Put together with a big brad button (mine is 25mm). (I got vinyl letters to say "FHE" on the brad button.

9- Stick some magnets on the back and you are done!! Enjoy! Pin It

LinkWithin

Related Posts with Thumbnails