When my daughter turned 8 we got her new scriptures and a scripture tote in her favorite color, green. It was kind of plain and not real girly-looking, so I got a pretty pin with her initial and some bling to try and it up a bit. It wasn't quite right by itself, so I found some grossgrain ribbon that matched perfectly to add.
I used floral wire to hold the 2-piece bow together, hot glued the little pearl strands over the center, Fray Checked the ends of the ribbon tails, then hot glued the bow onto the scripture tote. I attached the pin and got glued the clasp shut. Done! My daughter was pleased with the finished product, and I was grateful that it was quick and easy.
I forgot to snap a shot of Hailey's green tote before I started, so here is my son's identicle [blue] scripture tote next to hers.
Pin It
Showing posts with label LDS. Show all posts
Thursday, July 19, 2012
Friday, June 8, 2012
My New Temple Dress
I want to show you my new 3-piece temple dress that I put together for only $10!
The background story:
I own 2 other temple dresses that are too small for me with all the weight I've gained over the years since before I left for my full-time mission. They are an adjustable size small/medium and a size large, (both homemade). Well, I've gained so much weight that I've been renting a dress from the temple every time I go. I got tired of renting a dress, plus you can't rent temple clothing at most temples now. So I decided it was time to get a new dress, but I didn't wanted it to be pretty and comfy without having to spend a lot of money.
What I did:
I was at Ross one day and saw some long, white summer skirts on the rack. At that moment I decided that my temple dress would be a skirt and top instead of a dress. It took me several trips to Ross, Burlington Coat Factory, other discount stores, and different thrift stores. (I would always just keep my eyes peeled for the perfect "white" pieces.)
Where I got my 3 piece temple dress:
I got the white skirt at the Good Will for $3 because it was half-off.
I got the white (knit) shirt many months later, also at the Good Will for $1 (half-off).
I got the lace-collared top at Burling Coat Factory just last weekend to complete the outfit, at the cost of $5.99. *This top was not gathered at the bottom when I bought it. It was really loose and unflattering, so I added elastic around the bottom hem to give it a more finished look.
Goal accomplished! Cute, comfy and inexpensive!! Pin It
The background story:
I own 2 other temple dresses that are too small for me with all the weight I've gained over the years since before I left for my full-time mission. They are an adjustable size small/medium and a size large, (both homemade). Well, I've gained so much weight that I've been renting a dress from the temple every time I go. I got tired of renting a dress, plus you can't rent temple clothing at most temples now. So I decided it was time to get a new dress, but I didn't wanted it to be pretty and comfy without having to spend a lot of money.
What I did:
I was at Ross one day and saw some long, white summer skirts on the rack. At that moment I decided that my temple dress would be a skirt and top instead of a dress. It took me several trips to Ross, Burlington Coat Factory, other discount stores, and different thrift stores. (I would always just keep my eyes peeled for the perfect "white" pieces.)
Where I got my 3 piece temple dress:
I got the white skirt at the Good Will for $3 because it was half-off.
I got the white (knit) shirt many months later, also at the Good Will for $1 (half-off).
I got the lace-collared top at Burling Coat Factory just last weekend to complete the outfit, at the cost of $5.99. *This top was not gathered at the bottom when I bought it. It was really loose and unflattering, so I added elastic around the bottom hem to give it a more finished look.
Goal accomplished! Cute, comfy and inexpensive!! Pin It
Monday, February 27, 2012
Tidbits of Utah {Wedding #2}
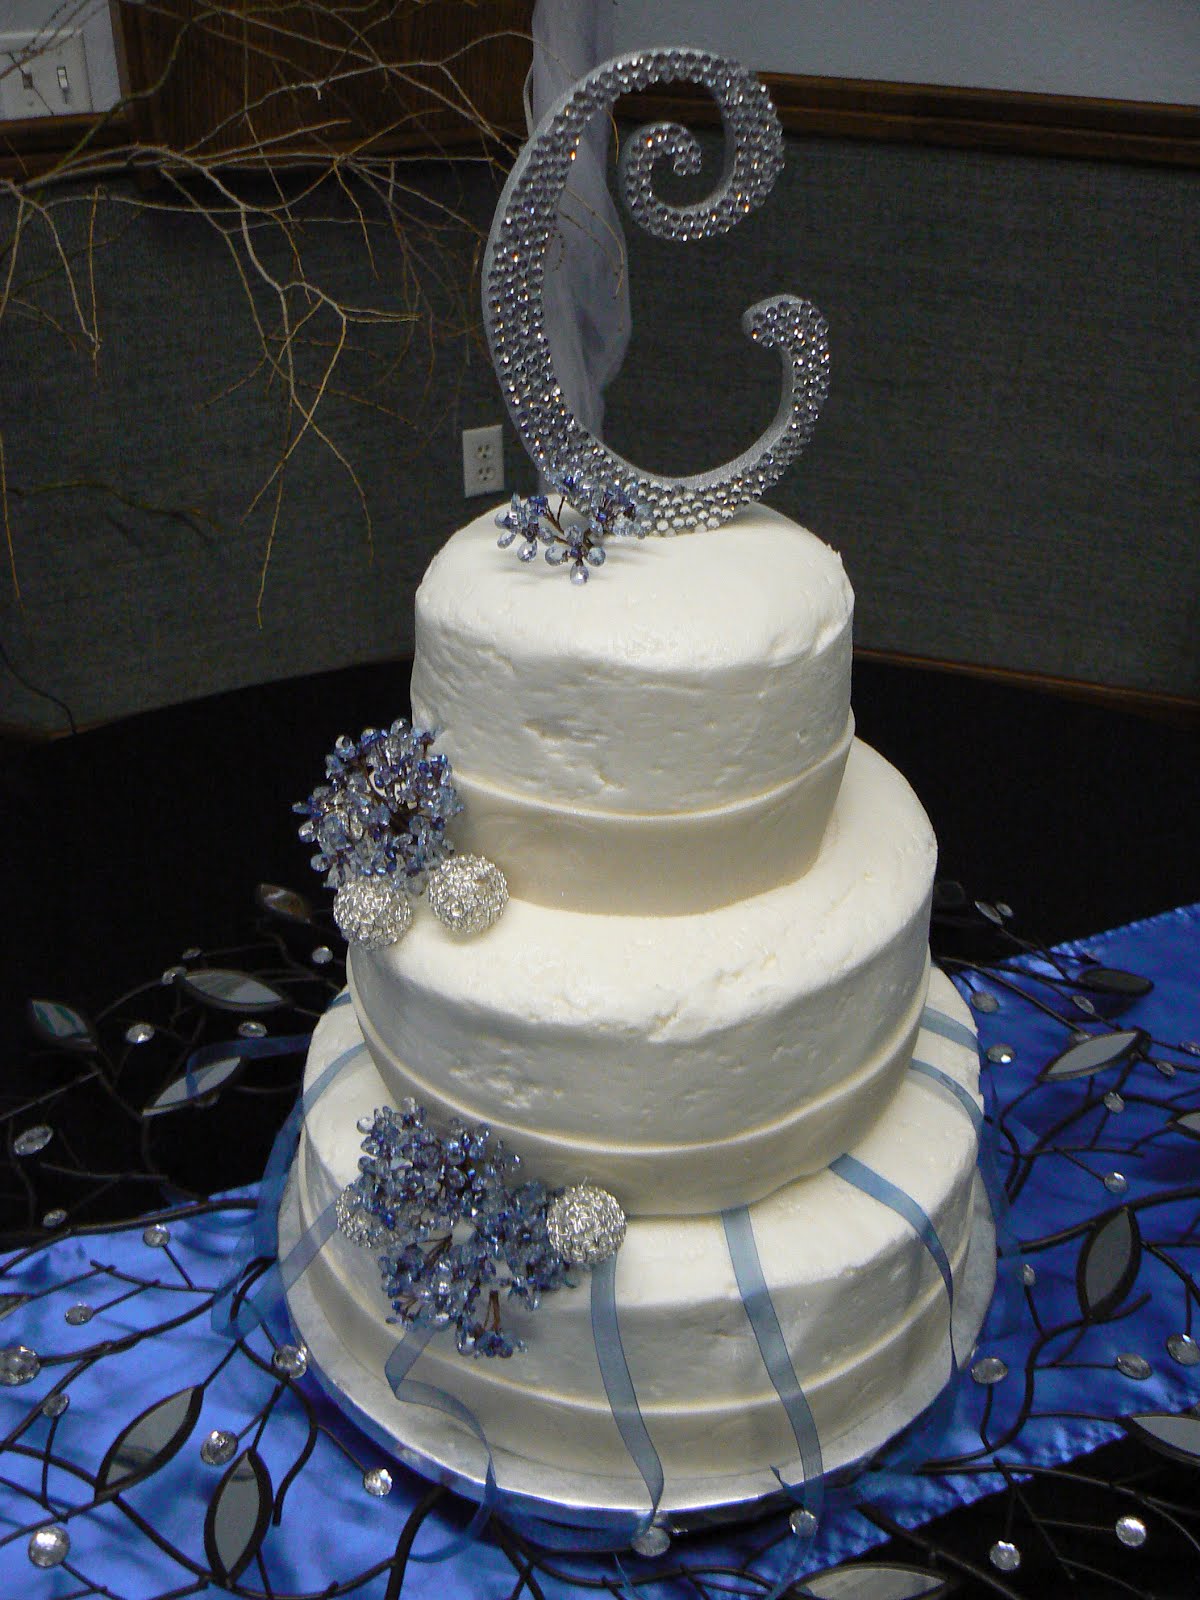
We just got back from attending my niece's wedding in the Draper Temple in Utah.
My SIL is helping my talents grow by asking me to do the wedding cake again. I love baking so I know it will at least taste good even though its not perfect on the outside(still trying to get that right).
I used this for the base of the cake. Its a wall mirror-I just took the mirror out and built a wood base to fit inside.
For the top of the cake: I cut a wood "C", spray painted it silver and adorned it with rhinestones.
The ribbons with charms(charms are under the cake plate)for the "Pull Cake". Since my husbands' family is from Argentina, they have a different wedding tradition. All the girls not married get to pull a ribbon from the cake. Whoever pulls the one with the ring is the one who gets married next. I cut some PVC pipes (the same height of the bottom cake)into the bottom cake to adhere the cake plate for the next cake tier.
This is the 3 Tier cake after finishing it. {Before the wedding}
This is the 2 Tier cake for the reception. . . .{After the wedding}
My heart skipped many beats when I saw the cake had fallen over. I had to fix it the best I could. I think between putting too much filling in the cake and the frosting not setting up properly, it just couldn't help but fall over. At least they will have some fun memories!
The reception room(done by the grooms family).
The beautiful Bride & our youngest daughter.
Pin It Pin It
Friday, January 13, 2012
Remember the ABC's
This months talk in the Ensign really hit home in my heart.
What a great way to not only jump start our January but help us to have a desire to live it all year long. I love these profound words by President Monson, who encourages us to have a more abundant life with a better perspective, blessings and the courage to live it.

You can go here to be INSPIRED!
Pin It
You can go here to be INSPIRED!
Saturday, December 10, 2011
An Amazing Artist and Some Touching Christmas Video Clips
Fist of all, I found (through Pinterest) the most beautiful photography artwork of Christ. Go HERE to find the photo above, plus lots more; and order prints!!
Soon I will share all my other favorite Christmas must-do's. But for now, here are the links to my SEVEN most favorite Christmas video clips, all in one place, in no particular order (on Youtube).
Merry Christmas! ENJOY!!
REAL MEANING OF CHRISTMAS
THE NATIVITY- BREATH OF HEAVEN
CHRISTMAS STORY- SILENT NIGHT (David Archuleta)
MARY DID YOU KNOW?
DO YOU HAVE ROOM FOR THE SAVIOR?
LET HIM IN (Michael McLean)
CHRISTMAS SPIRIT
Friday, November 11, 2011
Pray with GRATITUDE
I've decided to take Elder Bednar's challenge to have more meaningful Prayers with much Gratitude. The times I have done this, saying thanks for things and not asking for anything, I'm amazed at how many blessings I can see around me.
Pin It
Friday, September 9, 2011
Church Bag Activities {Part 5 of 5}
Now that we have all the [Extra] Activities done for each week, I can show you what I keep in the Church bag for every Sunday.

Simple Ones

Cars. I had this bag leftover from a family reunion treat. I decided to stitch on a car cutout so we knew that is where those go.


Mormon Ads. Great reminders. You can get these here.

ABC Book. This is one of my favorites! When the girls were little it was a great help to learn the ABC's but now it just helps during the Sacrament when they are supposed to be focusing on the Savior.

Inside the ABC book. Each letter has a gospel topic to go with it with added pictures of them. [Full post coming soon]. Pin It
Simple Ones
Cars. I had this bag leftover from a family reunion treat. I decided to stitch on a car cutout so we knew that is where those go.
Mormon Ads. Great reminders. You can get these here.
ABC Book. This is one of my favorites! When the girls were little it was a great help to learn the ABC's but now it just helps during the Sacrament when they are supposed to be focusing on the Savior.
Inside the ABC book. Each letter has a gospel topic to go with it with added pictures of them. [Full post coming soon]. Pin It
Thursday, September 8, 2011
Church Bag Activities {Part 4 of 5}
WEEK 4
Puzzle(dollar store find) & Lego car to build
Magnet container with Sticker Magnets
I started with a tin I found at the second hand store, stickers(walmart) & magnetic sheet(walmart/craft stores).
Place the stickers on the magnetic sheeting.
Cut around the stickers with your scissors-as close as you can.
Place them in ziplock baggies, label them then place the baggies inside the container for easy storage. They will use the container as their magnetic surface. Pin It
Wednesday, September 7, 2011
Church Bag Activities {Part 3 of 5}
WEEK 3
Dry Erase Board (this was such a hit I had to do it again)
"Fun Stuf" Binder (I had so many of these I made a 2nd binder) Pin It
Tuesday, September 6, 2011
Church Bag Activities {Part 2 of 5}
WEEK 2
Magnets (they love these so much we've had them since our oldest was little-about 10 yrs now)
Magnetic sand to create on a face.
Stitching Cards with Gospel Pictures. I just printed the pictures on card stock paper.
I started with these stitching cards (found these at Michaels" & used my 40% coupon)
I wound the laces on the ribbon cards (found at scrapbook stores/walmart) so they wouldn't get lost or tangled up.
Cut out the pictures and place them face down on the Contact paper (like I did here in this post)
Use double stick tape so it adhere's to the stitching card.
Adhere to the front. I did both sides of each card. Pin It
Monday, September 5, 2011
Church Bag Activities {Part 1 of 5}
WEEK 1
I've been thinking for awhile now that I needed to get something AGAIN put together for our Sunday Church Bag for Sacrament Time. Our 2 youngest still need those activities to do so they will have a greater chance of listening. We usually have not planned well from week to week so we are running late and I will either grab just a few things or nothing at all. So starting yesterday I made a resolve to be prepared every week for Sacrament time. Each week I will have an extra (xlarge ziplock) bag, that changes, to put in our church along with the regular every week items(this post will come on Friday). This way I can just grab the appropriate bag for the appropriate week. Already to go.This is a dry erase board with special crayons(Walmart had the best price).
This is our "FunStuf" binder. The cutouts are from the Friend magazine & laminated.
Inside the binder with the special wipe off crayons.
*TIP: for both these items we use our microfiber rags. They seem to wipe the board and laminate pages off better. Pin It
Saturday, June 25, 2011
Pioneer Day Celebration Posters
I was asked to make some posters for our church buildings highlighting the event our Stake is going to celebrate. In July we celebrate our Pioneers.

I of course couldn't just do a simple writing on the poster board-I had to Heatherize it!

I used this scrapbooking spray ink to wet the edges.

Then I wiped it.

I used postal paper, crumbled it many times, & taped it to the poster board. Then using the 1/8" hole punch, I punched around each edge. I threaded the hemp string(found at Walmart in jewelry section) through each hole to "sew" around the whole poster board. After this I used my firestarter to burn the edges. CAUTION: do this outside & do small sections so you can put the fire out with your shoe!
[Adhere Picture: taken from the cover of the July 2010 Friend Magazine] Pin It
I of course couldn't just do a simple writing on the poster board-I had to Heatherize it!
I used this scrapbooking spray ink to wet the edges.
Then I wiped it.
I used postal paper, crumbled it many times, & taped it to the poster board. Then using the 1/8" hole punch, I punched around each edge. I threaded the hemp string(found at Walmart in jewelry section) through each hole to "sew" around the whole poster board. After this I used my firestarter to burn the edges. CAUTION: do this outside & do small sections so you can put the fire out with your shoe!
[Adhere Picture: taken from the cover of the July 2010 Friend Magazine] Pin It
Monday, May 9, 2011
Publish a Group Cookbook
Have you ever been in charge of putting together a WARD COOKBOOK (ward or other big group)? Or as a fundraiser for the PTA? These things are not an easy feat. In fact, friends in my last ward on the cookbook committee, said it was so time-consuming that they'd never want to be in charge of that kind of project again.
I want to let you all know that doing a ward (or group) cookbook has gotten a whole lot easier, and less time-consuming for the committee! And it is a wonderful fundraising opportunity for the PTA or other organization you're involved in. The PTA did this as a fundraiser for my children's school this year, and that is how I found out the easy way to do a group cookbook.
After shopping them out and comparing the different cookbook websites online, I decided to go with MORRIS PRESS COOKBOOKS (the same company that our PTA went with).
The most wonderful thing about this company is that everyone in your group/family/organization can contribute and submit their own recipes THEMSELVES! It takes HOURS of work OFF the ones in charge!!
It's super easy to get started. Go to their website and order a FREE starter kit. They will take you step-by-easy-step into this fun project!
Here's my 2-cents worth of advice
(if this is a ward cookbook)...
-Have a small committee. We had just 2 of us- myself as chairperson and another as co-chair. (The RS presidency were committee members, but just for moral support and insight- not expected to do anything.) Designate your responsibilities. (I was in charge of getting people excited about the cookbook, emailing them information, and proofing recipes. Brenda was in charge of passing around the sign-up sheets, making the spreadsheet, collecting the money, and sending in the final order after we filled out the form together.)
-Start with a sign-up sheet for names, email addresses and phone numbers (for those wanting to contribute and/or participate). This will give you their permission to contact them in regards to this project. With that list, start a spreadsheet that you can update and send back and forth between you and the co-chair.
-Email me at TheCreativeHomemaker at gmail dot com if you would like to see the message I typed up and clipart I used to introduce this project to our RS.
-Make sure you clearly explain exactly how you would like everyone to label their measurements. ie: "Please follow the guideline examples given in 'Typensave'." or "Please use 'T' for Tablespoon and 't' for teaspoon." and so on. (This is something I did not do and wish I had. It would've saved me a lot of time in the proofing process!)
-Proof the recipes every few days when you have a second here and there. I waited and did them all at once. Exhausting!
We were able to get 200+ cookbooks with 400 recipes for about $5 each. It's been a success! The money has been collected (the hard part), Brenda and I are alive and well, the order is in, and we are anxiously awaiting our books!!
*Please Note: In our church, these are NOT (and should not be) used as a fundraiser. This is simply a fun, unifying opportunity for our ward relief society. I think every ward needs a ward cookbook every once in a while!
Pin It
I want to let you all know that doing a ward (or group) cookbook has gotten a whole lot easier, and less time-consuming for the committee! And it is a wonderful fundraising opportunity for the PTA or other organization you're involved in. The PTA did this as a fundraiser for my children's school this year, and that is how I found out the easy way to do a group cookbook.
The most wonderful thing about this company is that everyone in your group/family/organization can contribute and submit their own recipes THEMSELVES! It takes HOURS of work OFF the ones in charge!!
It's super easy to get started. Go to their website and order a FREE starter kit. They will take you step-by-easy-step into this fun project!
Here's my 2-cents worth of advice
(if this is a ward cookbook)...
-Have a small committee. We had just 2 of us- myself as chairperson and another as co-chair. (The RS presidency were committee members, but just for moral support and insight- not expected to do anything.) Designate your responsibilities. (I was in charge of getting people excited about the cookbook, emailing them information, and proofing recipes. Brenda was in charge of passing around the sign-up sheets, making the spreadsheet, collecting the money, and sending in the final order after we filled out the form together.)
-Start with a sign-up sheet for names, email addresses and phone numbers (for those wanting to contribute and/or participate). This will give you their permission to contact them in regards to this project. With that list, start a spreadsheet that you can update and send back and forth between you and the co-chair.
-Email me at TheCreativeHomemaker at gmail dot com if you would like to see the message I typed up and clipart I used to introduce this project to our RS.
-Make sure you clearly explain exactly how you would like everyone to label their measurements. ie: "Please follow the guideline examples given in 'Typensave'." or "Please use 'T' for Tablespoon and 't' for teaspoon." and so on. (This is something I did not do and wish I had. It would've saved me a lot of time in the proofing process!)
-Proof the recipes every few days when you have a second here and there. I waited and did them all at once. Exhausting!
We were able to get 200+ cookbooks with 400 recipes for about $5 each. It's been a success! The money has been collected (the hard part), Brenda and I are alive and well, the order is in, and we are anxiously awaiting our books!!
*Please Note: In our church, these are NOT (and should not be) used as a fundraiser. This is simply a fun, unifying opportunity for our ward relief society. I think every ward needs a ward cookbook every once in a while!
Subscribe to:
Posts (Atom)