Showing posts with label Valentine's. Show all posts

Thursday, February 14, 2013

HaPpy VaLentInE'S DaY

I love putting "love" notes under each chocolate for my loved ones.
Pin It Pin It

Monday, February 11, 2013

Love Note 3-Paper FoldOut

I just made an accordion paper fold message. 
Tape the bottom flap to 3x5 card and tie up with string.
 Remember to seal it with a KISS!
Pin It Pin It

Saturday, February 9, 2013

Love Note 2- Candy Message

I love the fun words on these hearts.

I used them to create a simple endearing saying.

[I didn't glue them on so the kiddos could eat them.]
Pin It Pin It

Friday, February 8, 2013

Love Note 1- Magazines

This year I'm taking the simple route with giving Valentines to our kids.
Each day, until Valentine's Day, I will sprinkle a little "love" with a message on a 3x5 card.
I just got a pack of 3x5 cards at the dollar store to use for all the "love notes".
 For today I recycled some magazines and chocolate hearts to create a love note.
Pin It Pin It

Thursday, March 1, 2012

"Broken Up" {Heart}

I finally finished this project just in time to use for next years Valentine's Day. Yes, its been one of those month's.


My friend, Keva, is the one who inspired me with this idea. She asked me to cut out a heart (18" tall x 9" wide)for her that was cut up to put on a board (19" long x 9 1/4" wide)so she could hang it on her front door.
Keva's Finished Heart:


Heather's Finished Heart:


I mod podged different papers on it and sanded the edges for the aged look.


I brad nailed the wood molding pieces to "hinge" the other heart pieces together.


To hang it, I cut an 1"x20" piece of fabric. Sew together and fray the edges by pulling it thru your hand.


Pin It Pin It

Tuesday, February 14, 2012

Valentine FHE


We had one of the best Family Home Evenings last night. Not just because it was simple but it had a lot of
meaningful moments.

We talked about {REAL LOVE}. I read this quote: "Real love enlarges the soul. It helps us to bite our tongue when it would be easy to say hurtful words. It gives us an understanding heart that is filled with compassion for another. It enables us to be more patient with others' imperfections and acknowledges our own. The miracle of real love is that those who choose to love blossom under the sunshine of trust and appreciation-they even become more lovable. Whenever we make a choice for lasting love, we grow. Our hearts expand in kindness; our minds are more open to another's point of view. Love is an act of will-namely, both an intention and an action. "Will" implies choice. We do not have to love. We choose to love."
-[from the Spoken Word February 15 2005]


Then we each took our paper heart: wrote our own name on it, then passed it to our left so the next person could write on it. We wrote something that we LOVE about that person. We kept passing until everyone could write on each one. Lots of Laughs & Smiles!


The activity for FHE we made our {yearly} valentine tradition cookies (recipe & how to here) for their classmates.

HAPPY VALENTINE'S DAY!!!

Pin It Pin It

Wednesday, February 8, 2012

Easy Heart Wreath

I finally made a craft! It's been a while, since I'm now a working mom. But I needed something new for my front door for Valentine's month! So I created a simple heart-shaped wreath from 3/4 yard of fabric and 2 old wire hangers. Wanna make one?

Here's what you'll need:
-2 wire hangers
-3 (1/4 yard pieces) of fabric in coordinating colors
-Heavy-duty wire cutter/plyers
-Sewing scissors or rotary cutter
Preparing the Wire Heart:
1. "Un-twist" the hangers to pull them apart. (I did not need the plyers for this.) Squeeze the curved "hanger" part into an oval shape, so it can be used to hang the wreath! (This will be at the top/center of the heart.)
2. Cut one of the hangers in half with the heavy-duty plyers. (You only need 1 1/2 hangers for this project.)
3. Using the heavy-duty plyers, twist the 1 1/2 hangers together (with their already twisted parts).
4. Connect the ends at the top/center of the heart with plyers. (This will require some "elbow grease".)
5. Bend at the opposite end to make the bottom tip of the heart, then shape the rest of it into desired heart-shape.

Preparing the Fabric Strips:
1. Cut each of the three 1/4 yard (9") fabric pieces in half length-wise (which will leave you with 6 strips that measure 4 1/2 x 44").
2. Double up the fabric strips (or more depending on the quality of your scissors or rotary cutter) and cut about 1" strips all the way down. (You will end up with tons of little strips measuring about 1" x 4 1/2 ".)
3. Organize the strips into their own 3 groups.


Putting it Together:
1. Turn on a good chick-flick movie and get cumfy.
2. Tightly tie on all the little fabric strips to the wire heart in your desired pattern. (You do not have to tie a double knot.)
3. You're done! Hang up your wreath and show it off!! (In fact, take a pic and show me too!)


Happy Valentine's Day!! Love, Angela
Pin It Pin It

Monday, February 6, 2012

{Be Mine} Valentine Decor


I had this frame left over after redoing our daughters' room.


Cut the "wood lath" to fit the width of the frame(10"x10"). Drill 2 holes in the top for future fabric strip.


Before painting the board, tape the back.


Paint boards pink.


Paint frame red.


Use the negative part of the vinyl for the image transfer. {You can buy the vinyl image here}


Spray the image white. Spray a few coats.


Sand the image to give it an "aged" look.
Glue the boards into the frame.

Pin It
Pin It

Saturday, February 4, 2012

Valentine Quote Block

I have a banister at the top of our stairs that I like to put decorations on. You can see the decoration from the stairs and the playroom. So to make it double duty, I took a simple 2x4. . .


I really liked how I painted the Countdowns with red and pink then sanded it to give the "aged" look. I cut the 2x4 to 9 inch in length.

I added my vinyl quotes. . .


Side 1


Side 2

{you can buy the vinyl here}

Pin It Pin It

Thursday, February 2, 2012

Tissue Paper Heart Block


Just another item out of my scrap wood.


I started with wood that measures 7" x 9" x 1 1/2".


I painted the wood then added the circles like I painted here for this project.


I crumpled up some tissue paper and brushed on the glue(mod podge) between the 2 layers with a coat of glue on top. If you don't want to see the natural wood color then paint the wood heart the same color as the tissue paper.


Cut off the excess tissue paper with an xacto knife and sand the edges.


Spray with a clear protective coat. Adhere the vinyl "love" word (buy here) and attach a mesh ribbon.

Pin It Pin It

Wednesday, February 1, 2012

XO XO


Spread the LOVE this month!!!
Pin It Pin It

Tuesday, January 31, 2012

Valentine Countdown {#1}


Our kids love Countdowns.
When I found this inspiration & decided to make my own version, I was so excited to make it(and blog it).

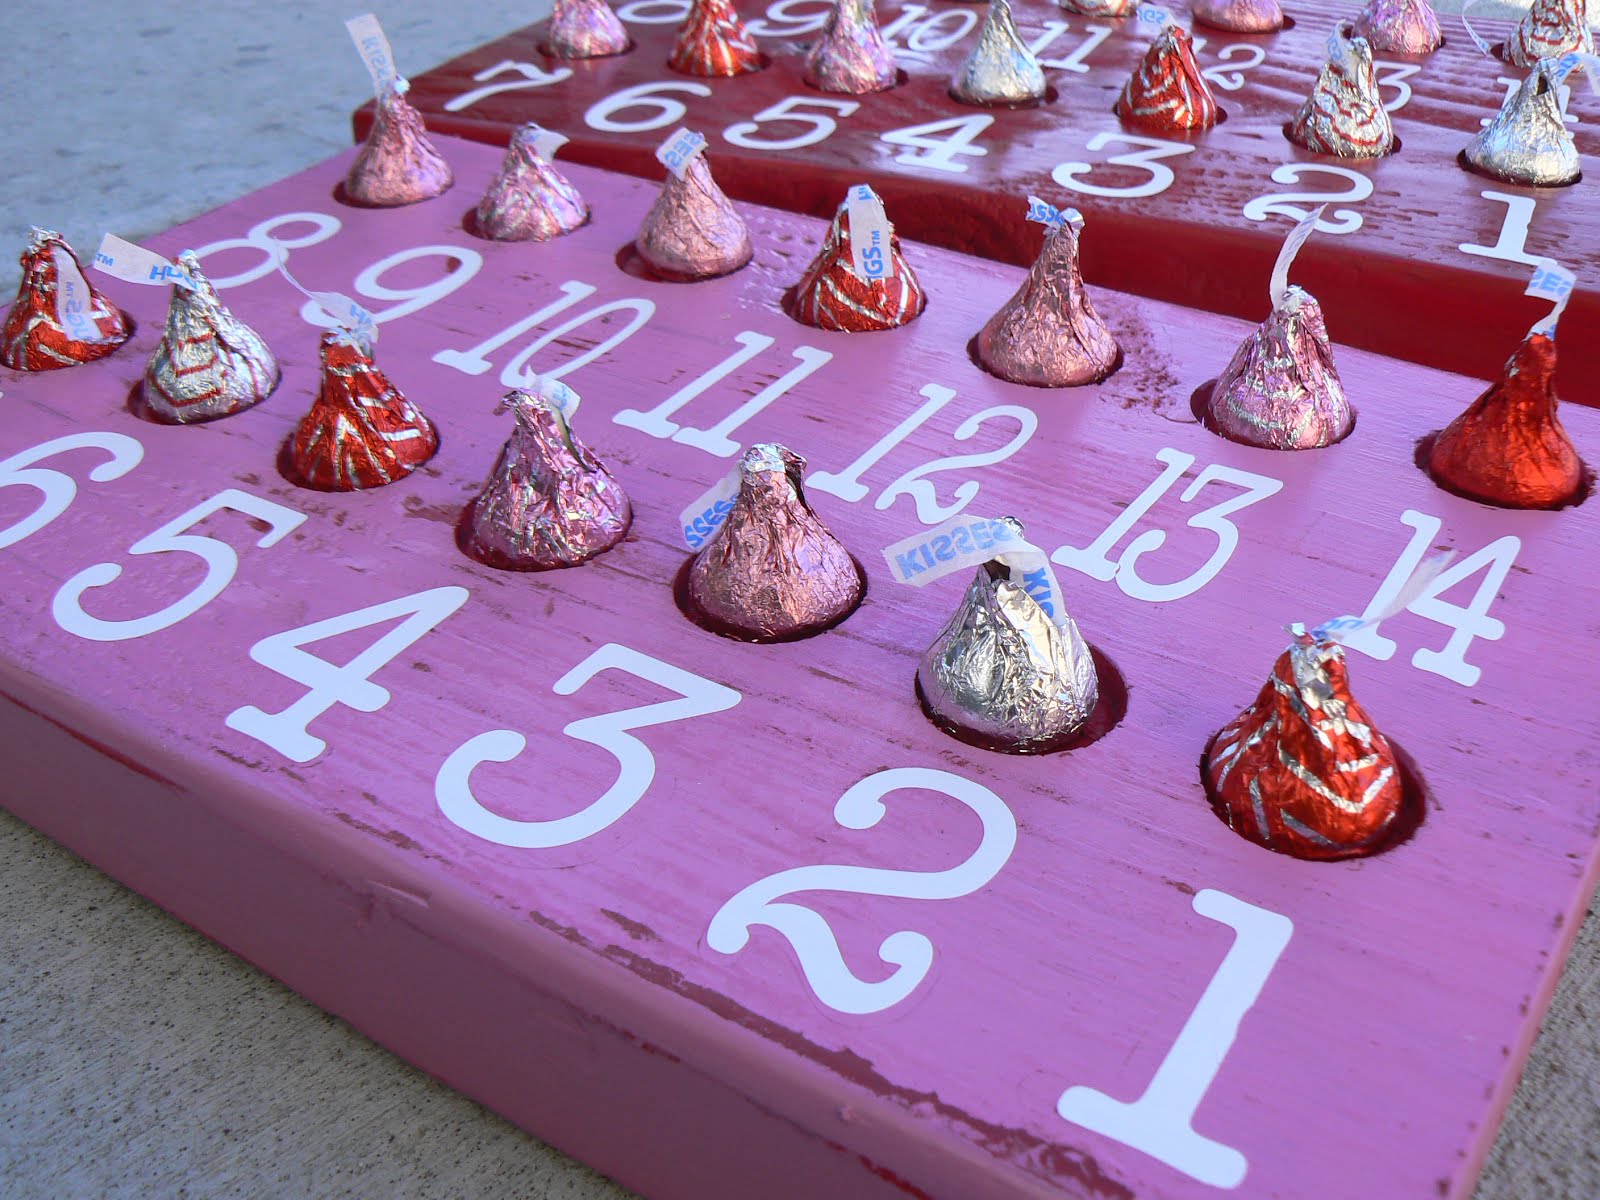
With some leftover wood I had, I started with a board that measures 7 "x 11"x 1 1/2". I drilled 14 holes using a 1" wood boring bit. The washer helped as a guide for the hole placement.


I used a dremel to carve the numbers using the vinyl negative.


I painted the wood red then pink. After it was dry, I sanded the whole piece.


I had to paint the numbers brown (the carved #'s didn't work as well as they did in my head). Then on the sticker I added dimension with Glossy Accents.


If you don't want to see the drilled holes you could punch out 1" circles and attach them with glue dots. [I did brown paper for the chocolates that will go there]


These are the ones I did for the kids with vinyl #'s. The pink ones are for the girls and the red one is for our little man. You can buy the vinyl numbers here.


Fill the holes with Hershey kisses/hugs candies.


They get to eat a candy Kiss/Hug as they Countdown the days!

Pin It
Pin It

LinkWithin

Related Posts with Thumbnails