Showing posts with label KITCHEN. Show all posts

Monday, April 15, 2013

Kids Jello Cups

In efforts to save money on my kids' lunches; 
I'm making and stocking up again on the Jello Cups.

I mix the jello according to the package and then
 put the mixture into these 3 1/4 oz. Portion Cups
[I get the portion cups at a local store called Cash and Carry but Costco sells the 2 oz. size]. 
Out of 1 package I can get 8 cups worth.
Store bought= $2.00 + tax (for 8/Walmart pricing)
Homemade=    $0.68 + tax (for 8/ Walmart pricing)

It will add up too quick so this is a great savings. 
Plus you have the option to mix flavors if you're feeling wild and crazy!
I LOVE saving money!!!


Pin It Pin It

Tuesday, November 13, 2012

Hot Lunch Chart

Our girls love to have hot lunch(especially the middle schoolers-its much "cooler")but it gets a little spendy. We have agreed they can choose one day out of the week to have hot lunch, so to keep me prepared I made this chart.
I used a leftover piece of plexi-glass.

Brush on some Mod Podge.
Lay your desired fabric and glue a magnet on the back.
Attach the vinyl. Now just use a dry erase marker to change it from week to week.
Pin It Pin It

Saturday, August 18, 2012

Flavored Water

I've been drinking about 10 cups of water a day. Since its getting a little boring I figured out that I can flavor it .

I use these syrups(found at Cash & Carry store). It gives it enough flavor but it still tastes like water (if that makes any sense).

 I put 2 sqirts(= about 2 TBl.) in a 12 oz. cup of ice water. Pina Colada & Coconut are my favorite.

Pin It Pin It

Wednesday, August 15, 2012

Homemade Un-Crustable Sandwiches

I am sooo EXCITED to have found this new kitchen gadget for making sandwiches.
Last week I was getting bread for sandwiches and this Kitchen Tool (at Walmart)was hanging by it. Our kids love sandwiches without the crusts. I always have to cut the crusts off(unless its homemade) the bread- its a pain but I love my kids so I do it. Sometimes we will will buy the "uncrustables" but their not as versatile, healthy and a little on the spendy side.
With this Tool all you have to do is place the tool on the bread. Push down the white first then the red. Automatically you have a uncrusted pillow pocket sandwich-the "insides" have endless possibilities.

 Thank you Wonder for coming up with such a Fabulous idea!!!
Pin It Pin It

Wednesday, July 25, 2012

My Organized CookBooks

After many months of looking at my Cookbooks in three different places I finally had time to fix that problem.
Here is the cabinet I'm going to use that is in our dining room.
My many cookbooks.
I measured the cabinet and cut the wood accordingly to fit.
Finish off the edges with thin wood (lathing).
To hold up the ends I just used some 2x4's until I can build some bookcases to go underneath.
 the Finished project. I reused some of my wire baskets for the magazines. The hard bound books are stacked on the shelf in the cabinet. The daily binders are in the kitchen cabinets.
Pin It Pin It

Tuesday, July 24, 2012

My FAVORITE Doughnut

Our family recently went on vacation to the Oregon Coast. On the way back we stopped in Portland to enjoy some Good Eats!
We went to this Doughnut shop and had to wait 20 minutes in line to order. 

This is now my favorite doughnut(I might have to "heatherize" a Krispy Kreme doughnut so I can have this on a more regular basis-since we only go to Oregon once a year). 
It has chocolate icing, crushed oreos, and peanut butter drizzle. Now it just needs a bunch of coconut and it would be perfect!
Pin It Pin It

Monday, July 23, 2012

Waffle Muffins

I had some bulk blueberry muffin mix in my pantry. One morning recently, we were out of cereal. So I got out my waffle iron and mixed up the blueberry muffin batter. I sprayed the waffle iron with non-stick spray and cooked the "muffins" in it. They turned out delish!

Pin It

Tuesday, June 19, 2012

French Waffles

"Mom, can I make breakfast?" is something I hear often on summer mornings. How about waffles? Or maybe French toast? Yum! Two of my faves. Why not do BOTH? In ONE?


My good friend Tristin T. did just that. She combined French toast and waffles and called it "French Waffles". Perfect! And it's super simple: Simply make French toast like you normally would- bread dipped in egg mixture, and cook it on your hot, Pam-sprayed waffle iron. Walla! French Waffles.
*Tristen says she makes a bunch of these at a time and freezes them for re-heating. Great idea for a quick meal!
Pin It

Thursday, January 19, 2012

Danish Pancakes


Our kids LOVE these Danish Aebleskivers(aka danish puffy fried cakes). I picked up this pan awhile back in a cooking store(but you could buy them here) and it has added much pleasure to our morning breakfasts'.


After making the batter(recipe at the end of post), coat the pan with nonstick spray then pour into each cup of the pan. Fill only half full. If there's too much it will be doughy in the middle. Keep your pan at a lower tempature to cook.


Wait until it bubbles on the top, then you can flip it over.


Flip over the "aebleskiver" with a skewer stick(I found this out to be the best tool).


Our kids dip them in different syrups and jam. You could also sprinkle them with powered sugar.

Recipe:
2 cups flour
1 tsp. salt
1 tsp. baking soda
2 cups buttermilk or whole milk
3 eggs separated
Combine the flour, salt and soda. Add milk and egg yolks. Beat egg whites until light and fluffy. Gently fold egg into the batter. Grease each cup(i do it every time so they don't stick) with spray vegetable oil. Cook until golden brown on each side.

ENJOY! Pin It

Saturday, January 14, 2012

Knitted Kitchen Hot Pad


My second daughter was practicing with her loom and knitted this Hot Pad.
I wanted to add some strength to it so I sewed a piece of fabric to the back.


Cut a piece of fabric an inch bigger than the knitted square.


Fold over the fabric edge and pin the knit piece to the fabric.


I sewed around the edges 3 times to make sure it will stay together.


All sewn together.
Pin It

Monday, November 21, 2011

ICE Container


I LOVE LOVE Sonic Ice. I will go there just to get a large ice water with extra ice when I out & about. I thought Thanksgiving would be a perfect time to bring some in.
Here is my Sonic Ice Container:

Container from Walmart-$2.38(found in the camping area)


I used my stencil & permanent marker to "pretty it up".


Fill up with Sonic Ice(only $1.58 a bag). I got the clear plastic scoops at the Dollar Tree Dollar store in the wedding section. Pin It

Tuesday, September 27, 2011

Remembering the Leftovers

I've had too many moldy Leftovers because I can't remember when I put them in the frig. Since were in the restaurant business we have to put dates on everything. I realized I needed to do this quick tip at home.


I just use these plain white circle labels to put the item name & date of when it was cooked & then its ready to be organized in the frig. Before I wash the container I just take the circle sticker off. Pin It

Saturday, August 20, 2011

Clean Cut Brownies


A friend shared this tip with me: use a plastic knife to cut Brownies. Make sure you let the brownies cool first before cutting.
I'm amazed that the brownies don't stick unlike when using a "real" knife.

It's Genius!!
Pin It

Tuesday, July 5, 2011

Perfect {Sunny Up} EGGS

My friend Holly shared a wonderful tip with me a while back on how to make perfect Sunny Side Up Eggs. I have been using this method ever since.


Spray your pan, crack your eggs into it, put 1 ice cube inside then put a lid on top. The steam from the ice cooks the egg. No need to flip it over. No broken yolks.


Perfect & Yummy! Pin It

Monday, June 20, 2011

Simple Message


I know this is Message is Super Simple but for Father's Day this was my husbands surprise for breakfast. I used the squeeze bottles to do the ketchup one & a knife to do the jam one. Pin It

Monday, May 9, 2011

Publish a Group Cookbook

Have you ever been in charge of putting together a WARD COOKBOOK (ward or other big group)? Or as a fundraiser for the PTA? These things are not an easy feat. In fact, friends in my last ward on the cookbook committee, said it was so time-consuming that they'd never want to be in charge of that kind of project again.

I want to let you all know that doing a ward (or group) cookbook has gotten a whole lot easier, and less time-consuming for the committee! And it is a wonderful fundraising opportunity for the PTA or other organization you're involved in. The PTA did this as a fundraiser for my children's school this year, and that is how I found out the easy way to do a group cookbook.


After shopping them out and comparing the different cookbook websites online, I decided to go with MORRIS PRESS COOKBOOKS (the same company that our PTA went with).

The most wonderful thing about this company is that everyone in your group/family/organization can contribute and submit their own recipes THEMSELVES! It takes HOURS of work OFF the ones in charge!!

It's super easy to get started. Go to their website and order a FREE starter kit. They will take you step-by-easy-step into this fun project!

Here's my 2-cents worth of advice
(if this is a ward cookbook)...
-Have a small committee. We had just 2 of us- myself as chairperson and another as co-chair. (The RS presidency were committee members, but just for moral support and insight- not expected to do anything.) Designate your responsibilities. (I was in charge of getting people excited about the cookbook, emailing them information, and proofing recipes. Brenda was in charge of passing around the sign-up sheets, making the spreadsheet, collecting the money, and sending in the final order after we filled out the form together.)
-Start with a sign-up sheet for names, email addresses and phone numbers (for those wanting to contribute and/or participate). This will give you their permission to contact them in regards to this project. With that list, start a spreadsheet that you can update and send back and forth between you and the co-chair.
-Email me at TheCreativeHomemaker at gmail dot com if you would like to see the message I typed up and clipart I used to introduce this project to our RS.
-Make sure you clearly explain exactly how you would like everyone to label their measurements. ie: "Please follow the guideline examples given in 'Typensave'." or "Please use 'T' for Tablespoon and 't' for teaspoon." and so on. (This is something I did not do and wish I had. It would've saved me a lot of time in the proofing process!)
-Proof the recipes every few days when you have a second here and there. I waited and did them all at once. Exhausting!

We were able to get 200+ cookbooks with 400 recipes for about $5 each. It's been a success! The money has been collected (the hard part), Brenda and I are alive and well, the order is in, and we are anxiously awaiting our books!!
*Please Note: In our church, these are NOT (and should not be) used as a fundraiser. This is simply a fun, unifying opportunity for our ward relief society. I think every ward needs a ward cookbook every once in a while!

Pin It

Tuesday, May 3, 2011

Tip for Today


My aunt Rena taught me a little tip I thought was interesting: Put OATS in your meatballs!

Last night we had meatball sandwiches. I just added 3/4 cup of old fashioned OATS to 2 lbs meat, 3 egg yolks & seasonings. I put them in the crockpot on low for 5 to 6 hours with sauce to cook. They held together well and tasted great. Pin It

Monday, March 14, 2011

My Organized Home, Part 2- Meal Prep

My daily dilemma- "What should I make for dinner tonight?" Can you relate? Then when you finally figure it out, you realize you're missing one or two of the ingredients to make that meal? It's the story of my life (when I don't plan ahead).

Making dinner (or any other meal) is my least favorite job as a homemaker!! For me, the worst part of it is choosing just WHAT to make every day. I've done a few different things to help in this area...

A. I've done FREEZER MEALS, (both alone and exchanged in groups with other women).
PROs (for me): cooking/preparing only once a month.
CONs: Still have to choose what to have for dinner everyday, and have to remember to pull out of freezer to thaw.

B. I've done the FRESH MEAL exchange/co-op with friends. *Did this one for a long time and loved it!
PROs (my opinion): Cooking once a week, no freezing, menu is scheduled and we know what we're having, fresh!, side dish included.
CONs: Finding that perfect group (4 of you) with similar size families and similar taste.

C. Right now I'm doing the 4-WEEK MENU method, and I'm really liking it so far. Here's how I'm doing it...

1. On the back of a laminated poster I had, I wrote down (with a dry-erase marker) all the dinners that I know my kids will eat. Then I presented it to my family and let my kids (and husband) vote to veto any they couldn't stand.

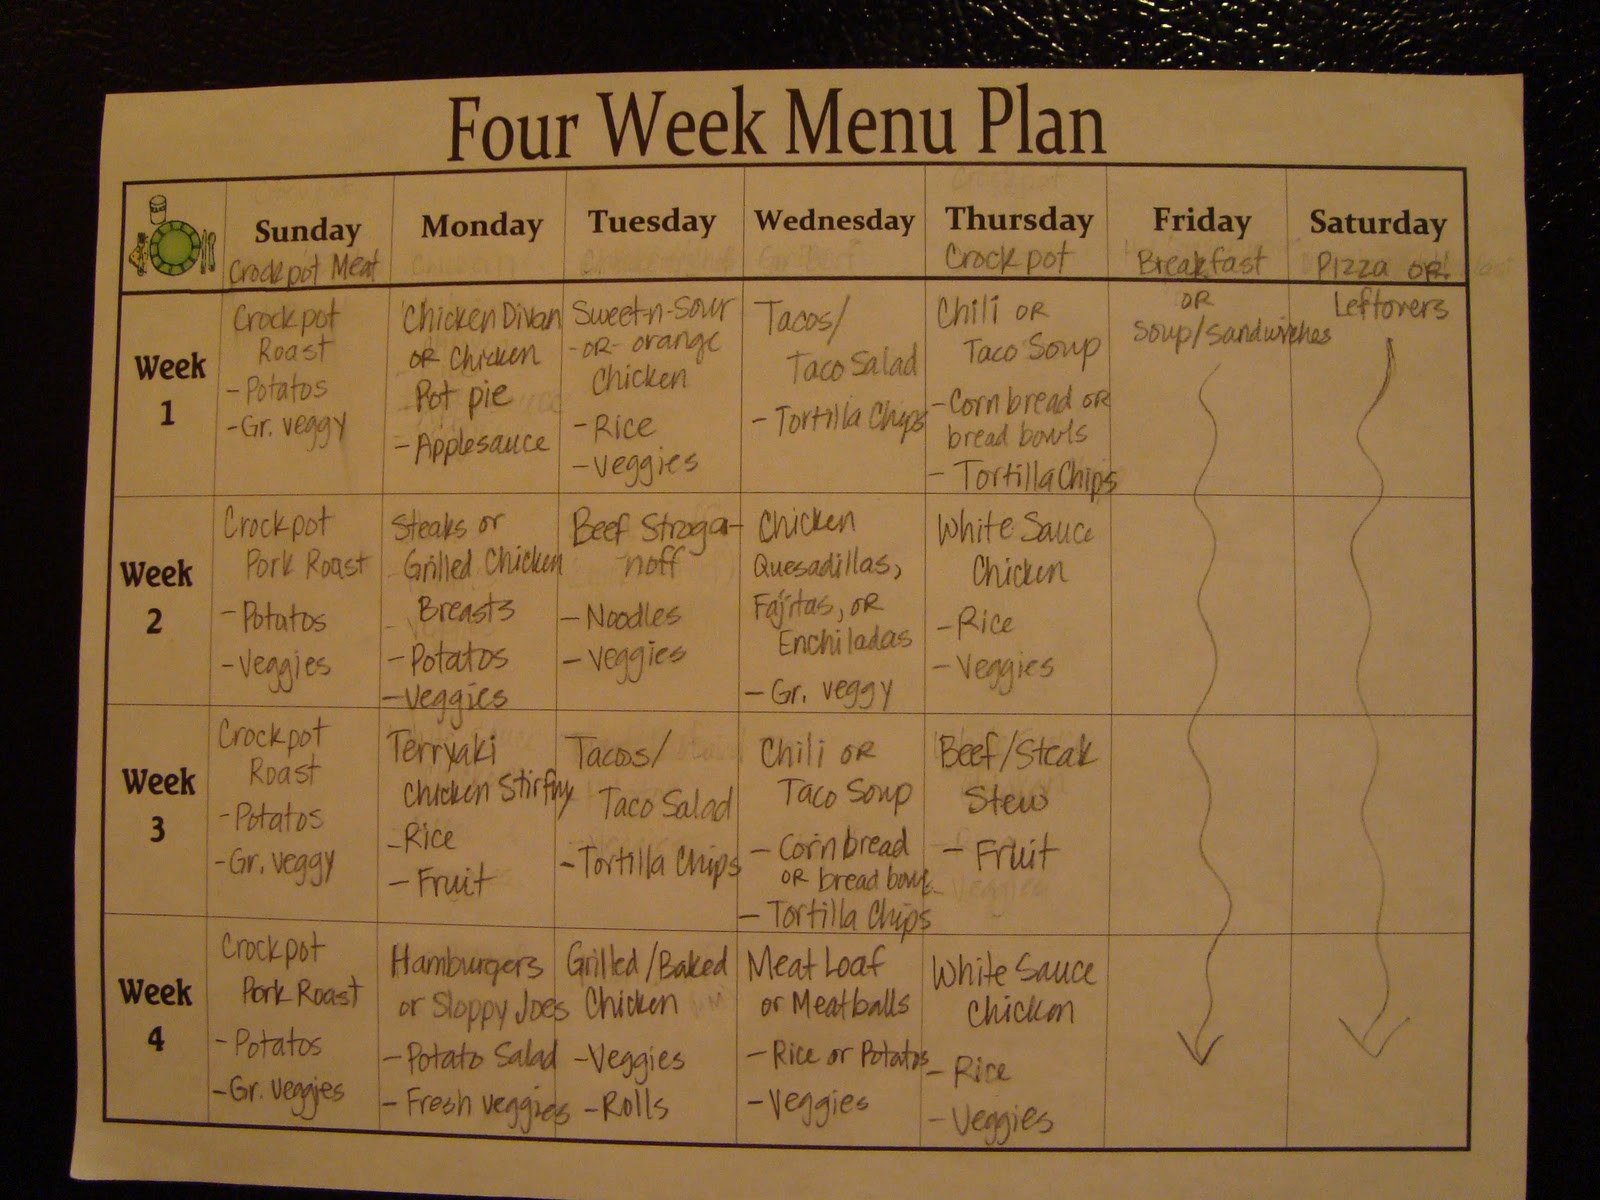
2. I then printed off one of my blank Four Week Menu Plans, and penciled in some weekly menu ideas. (I was sure to use a pencil because I had to erase several times to get it just right.)
*This was quite time-consuming, trying to figure out which meals to have in a week. I wanted to make sure we were switching it up enough, while trying to have similar ingredients (or sides) to use 2 nights in a row in 2 different meals. It's kind of tricky!

Click HERE to print my blank menu!

(Click on image below to read my "menu" up close.)


3. Now you can make a binder like Heather's that has all of the recipes for your menu. (Most of my recipes are in my "memory bank", so I haven't taken the time to do this step yet.)

4. Now I needed to make a grocery list to correspond with my menu. So I used my finished menu to guide me while I made a grocery list for each week, (also with consideration for the amounts of each item I would need for the whole week).
*It's a good idea to use a spreadsheet for this. I didn't, so it took me forever!
*I had already made a list of food and non-food staples, so I incorporated my weekly menu items into this list (4 times for the 4 different weeks) and color-coded the weekly items in each one. (I think my list is too big, so I am still making notes on them and changing things as I go, which is an easy fix as long as it's on the computer.)
*Categorizing and alphabetizing also help!

5. I printed out my four lists and put them into sheet protectors to keep in my coupon binder.
*I use plastic sheet protectors instead of laminating them, so I can easily change them up if needs be. Also, so I can check things off with a wipe-off marker without having to reprint the list.


I go grocery shopping every Friday (or Saturday) for the new week, and I have my lists ready and waiting. All I have to do before going to the store is to go through the list and check off all of the items I don't need. This took me a long time to organize, and I still make small changes; but it is saving me so much time and headache in the long run! Especially since I now work outside the home, part-time.

Pin It

LinkWithin

Related Posts with Thumbnails