Tuesday, March 13, 2012

Stitched Flower


When I was in Utah a little bit ago I went to this cute Quilting shop I visit every time I'm there. They had this
Stitched Flower pinned on a dress. They didn't have a pattern to buy so I had to make my own.


I cut a 3 1/2" flower template out of chipboard (you could use cardstock). Cut a piece of fabric(fleece or cotton) big enough for the flower template and sandwich a piece of batting("Warm & Natural Needled Cotton Batting")in between the fabric layers. Using the template cut the fabric flower.


Stitch around the flower with coordinating thread.


Stitch a "gathering" stitch(with this cool tip) down the strip of fabric(1/2" x 20").


Take the gathered fabric strip and stitch regularly into a coil in the middle of the flower.


The frayed coiled fabric strip in the middle.


Add some embellishments in the center of the flower such as buttons & rhinestones. Now its Ready to Wear!

Pin It Pin It

Wednesday, March 7, 2012

{Head Band} Holder


I started selling headbands at our local restaurant The Creperie. I needed something to put them on so this is what I came up with.


I cut a 2x4 (15" in length) and a 2x6 (15 1/2" long). At the base, glue them together. For added strength you could use either brad nails or screws.


Spray paint it black and sand the edges for an aged look.


Cut the tubes (Home Depot-4 1/4" in diameter) to 13 1/2" in length & drill 2 holes.


Cover the tube with fabric using Mod Podge Glue.


Use zip ties to adhere the tube to the 2x4.


Thread some fabric strips thru the holes.


Tie the fabric over the zip ties.


Head Band Ready!

Pin It Pin It

Monday, March 5, 2012

Quilled Heart

This is one of the gifts we gave to my niece, Rachel, for her wedding.

I loved this quote (thanks pinterest!) and thought this Quilled Heart would add a special touch.

Quilled Heart How To:

I cut strips of paper in 1/4"x8".


Take the paper and wind it around the tool. They have quilling tools but you could use a paint brush end, pen, pencil. . .


Use a pattern to guide you. . .


Glue the end. After this
one I figured out that the hot glue gun worked faster and better.


Put dabs of white glue (that will dry clear) on the bottom of the coiled paper.


Place the quilled coils onto your board to form the shape.


I did this one also.

Pin It Pin It

Saturday, March 3, 2012

Tidbits of Eagle {Wedding #2}


One more cake for my niece Rachel.


Her Cream Puff Cake{ aka Croquembouche = traditional French Wedding Cake}. Since there won't be enough for everyone I'll have platters with some drizzled with chocolate & caramel.

How I did it:


I covered the cake board with foil then adhered the styrofoam cone (Michael's 6"x 24" ) with carpet tape.


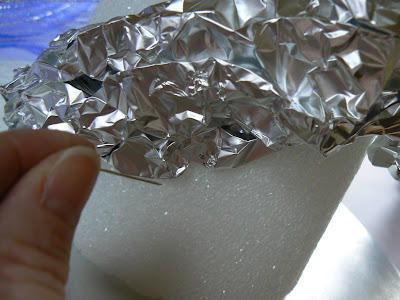
Crumble up the foil wrap into a long strand.


Adhere the foil strand to the cone with straight pins going up the cone like a winding stair case.


"Frost" the cone with caramel(so the cream puffs will stay a bit better) and cut the skewer sticks(about 1 1/2") to fit inside. Place almost frozen cream puffs(yes I'd love to take the credit for making these yummy treats but Costco had so many boxes- so much easier) onto each stick. I used about 130 cream puffs.


I put the same "C" I used for the other cake to top it off.


Water Station.


Hot Chocolate Station.


Table Centerpieces.


Where the Bride and groom will stand.
My SIL Fabiana has such great visions for decorating!

Pin It
Pin It

Friday, March 2, 2012

Shelving {Picture} Wall

My friend Katie is always willing to throw projects my way that challenge me and expand my talents. I love her for that!
She wanted some Shelving in her living room to display family photos.

This is how it turned out. . .


A side view of how I put the shelf together. (She is going to paint the back wood to match the wall). I used wood glue to attach the pieces then wood screws for added strength.


Her "!". [Its so that when friends & family come to visit their home, it is understood they stand for important things].

She still has a few more things to add plus some more pictures but I think it looks great so far.

Pin It
Pin It

Thursday, March 1, 2012

"Broken Up" {Heart}

I finally finished this project just in time to use for next years Valentine's Day. Yes, its been one of those month's.


My friend, Keva, is the one who inspired me with this idea. She asked me to cut out a heart (18" tall x 9" wide)for her that was cut up to put on a board (19" long x 9 1/4" wide)so she could hang it on her front door.
Keva's Finished Heart:


Heather's Finished Heart:


I mod podged different papers on it and sanded the edges for the aged look.


I brad nailed the wood molding pieces to "hinge" the other heart pieces together.


To hang it, I cut an 1"x20" piece of fabric. Sew together and fray the edges by pulling it thru your hand.


Pin It Pin It

LinkWithin

Related Posts with Thumbnails