Friday, January 28, 2011

Sewing {Thread} Holder

After looking at all my thread on two table for the last 8 months I finally got my Sewing Thread Holder done! Yeah!


I thought about buying these but since, when I sew, I like my top & bottom threads to match I needed a way to store my bobbins with the spools. This wall rack will hold 128 spools. Total dimension 31 1/2" x 23 1/2".


I cut some wood "shelves"(1x4's cut in 1/2 length wise= about 1 5/8" wide by 30" long) & hammered in some nails on the front side(1 3/4" apart) for the bobbins. I found this great idea to secure the end of the thread to the bobbin. Its just clear plastic tubing I cut to fit the bobbins(found at Home Depot). I added thin molding to the front to hide the seam. The backing is a piece of beadboard.


Its so nice to be able to find what color I'm looking for. Now I just need to fill it up.


Happy Sewing!

Pin It

Thursday, January 27, 2011

Egg Shells


My niece(early 20's) shared this Kitchen Tip with me the other day while cracking Eggs. I'm always irritated when I get a shell in with the egg yolk & white. There's nothing worse than eating eggs and then tasting a "crunch" that's not supposed to be there.


Take the shell and dip it back into the egg white to "pick up" the broken shell. It's amazing how the broken piece clings to the larger shell.

I know this is a simple tip but it will be very valuable in the kitchen.

I'm so excited to crack more eggs now.


Pin It

Tuesday, January 25, 2011

Battery Storage

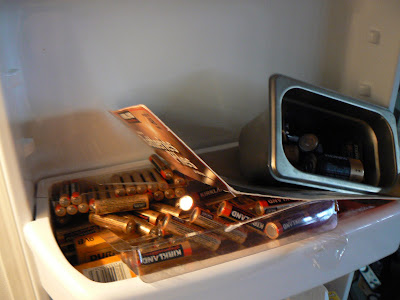
Since I keep all our batteries in the frig I thought it was time for them to be organized.


What a mess. . .


I re-used these containers(bulk containers from Costco).


Organized in the frig. . .


Pin It

Monday, January 24, 2011

My Organized Home, Part 1- The Colorful Calendar

I don't know about you, but I would be completely lost without my calendar! I have four calendars to keep me on track... my Microsoft Office one in my laptop, one in my BlackBerry (which I regularly sync with Micro Office), one on my bathroom wall (which is only there for moral support- no writing), and my most favorite- our big family one in the kitchen. (I came up with this idea a few years ago after being frustrated that I couldn't plan ahead with my big "wipe-off" calendar.)


With four school-aged children and now working part-time, I would go insane without a visual display of our daily activities! And with 6 lives to keep track of, just a big calendar wasn't going to cut it either. I had to add some color so I could remember the "who's, what's and where's" at a glance; and it's been working wonderfully ever since! Here's what our February already looks like... Aaaaa! But since everyone has a different color, I won't be losing my mind too much.


And thanks to Heather, I have a new/improved frame for my big calendar. She made one for herself, then one for me. She's the best!! (I gave my other one to my sister.)


So my first 2011, Organized Home tip is that if you are tired of your wipe-off board with only one month at a time, or your family calender is just not big enough; don't fret! Go get yourself a desk calendar (for $5 at Walmart) and some pens in different colors (also cheap at Walmart- in a package with red, orange, green and purple). I swear by it!!

You can make a frame for it like my original, or one like my new one that Heather made!

Pin It

Saturday, January 22, 2011

Cd's in ONE Place

A while back I got tired of trying to keep all the movie and music CD's organized. The cases seemed to take over & I had to keep buying containers to hold them all so I had an "ah" moment. I decided to put them all in the CD cases that zip up. The cases will hold any from 12-208 CD's. I store all the cases in the attic so if by chance I need them I can get to them easily but I don't have to deal with them on a daily basis.

My inspiration to my "ah" moment. . .


After looking at the Wii games on the floor all the time (like below). . .


I organized their games as well in ONE place. Now we have so much more room in that cabinet for other things. Love it!


Pin It

Thursday, January 20, 2011

Organized {Designs}


A few days ago, I finally found my Designs for scrapbooking and card making when I was organizing my craft room. I am so glad I did. The other day as I was looking thru my youngest daughter's (who is 8) book, I asked her where her other scrapbook was. She mentioned she didn't have one. My heart sunk. I did not realize I was that far behind (hers is at 2 years old). Boy am I excited to start back up again. Now I just have to find(actually make) the time!{lol}


Before I was inspired by Becky Higgins(she came out with page layouts=sketches) I was frustrated with scrapbooking because I would stare at the page & not know what to do. She came out with a brilliant idea, & I wanted to follow suit. So I grabbed all my Creating Keepsake Mags along with other ones & got to work "scraplifting" the main idea of the pages. Then I made my own template so I could put alot of designs on a page & put it in a binder. Then because of all the designs I had(1040), I place tabs of how many pictures would fit on a page. (for example-if I hade 4 pics then I go to the section labeled "4").


I also made one for my card ideas.

I know digital scrapbooking is becoming so popular but for me I love reliving the moments as I scrapbook. I love having those forgotten memories come to life in my mind again.


Pin It

Wednesday, January 19, 2011

Homemade Healthy Granola Bars

January is the typical time of year when most of us have to re-group, after all those Christmas treats are finally gone, and get ourselves back into healthier eating habits. I got this wonderful recipe a couple of years ago from a good friend of mine. It's the only Granola Bar recipe I have seen so far that does not call for actual sugar!! It uses honey instead...


Healthier Granola Bars

5 c quick oats
1 c coconut
1 c chopped almonds
1/3 c sunflower seeds (I omit these in mine)
1 c dry powdered milk
1 tsp salt
1 c honey
1/2 c olive oil (or canola)
1 tsp vanilla

*If desired, add 1 c chocolate chips, raisins, craisins, apple chips, or anything you want!

Mix all dry ingredients. Mix wet ingredients in seperate bowl. Now combine dry and wet and mix well. Press into greased bar-pan/cookie sheet. Bake at 300 degrees for 20-30 min. (Longer in oven, the crunchier. Less time in oven will be chewier.) Cut into bars while still warm. Let cool. Store in airtight container.


*Nutrition Info! If you cut these into 44 bars, they will each have a total of 118 calories. Enjoy!!

Pin It

Monday, January 17, 2011

Our Strong Family, a Few Marbles at a Time

Building a strong family is not always an easy feat. It takes a lot of diligence and effort, amongst our busy life. There are some things we do as a family that are easier for us than others. There are some that we struggle to be consistent with, which was really bothering me! I really wanted to bring our consistency and diligence up a notch, and "raise that bar" a little higher in my home.

So a couple of months ago I decided that we needed to have a Family Home Evening lesson on what it means to build a strong family. We sat the children down and had them help us list the things that help us to be valiant, as a family. We came up with 5 things, then added one more ("work") a couple of weeks later...


We wrote these things down and gave them each a rating (between 1-10) of how we felt we were doing at the time. Our goal is to get a consistent 10pt rating on every one of these. Every month we evaluate our list to see if we are reaching our goal. (I'd like to create a graph to show our progress, so I left the old ratings up there too. Kind of a mess right now, but once I get that done we'll be able to clean up the board a bit. **Anyone have an idea of how I could make this into some sort of graph?)


I decided that we needed an incentive to help motivate and remind us of our goal, so I washed out an old Kraft Mayonnaise container and turned it into a MARBLE JAR. Every time we do something on our list, we put a marble into our jar. (Some of these are worth 2 or 3 marbles, depending on difficulty levels, etc.) We decided, as a family, on a REWARD for when we fill our jar to the top (which will be going out to dinner at Panda Express- the kids' fave, as a family).

This plan has been working beautifully in our home. We certainly haven't been perfect, but we are striving daily. I've truly noticed a difference in our home when we are diligently doing what is most important! Pin It

Saturday, January 15, 2011

{Sunday China} Caddy

Since Sunday is the Day of Rest, I like to rest from my labors of doing dishes. Unless its a special Holiday(even then the thought does cross my mind to use paper & plastic products) I really don't like to do the dishes on Sunday. We started this tradition a few years back and it has become a Family Favorite. Until now I have just put all the eating supplies on the counter (we store them in a cabinet in the garage) but often times I will forget at least one of them. I knew we needed a Caddy for our Sunday China.


As I was walking thru Walmart getting containers for our business I found these for only $5.50.


I just added some ribbon, a marker(for writing names on cups) & cups/plates/bowls/napkins/forks/spoons/knives.

Now its all organized in one place!


Pin It

Thursday, January 13, 2011

Kids Room {Cleaning} Checklist

On Saturdays we clean our home.

One of the jobs each child has is to clean their own room. Since most kids idea of the room clean is different from the moms, our kids are no different. I wanted a list where they could check off but also I could double check when I came to inspect. I was inspired by Ang's idea to put a type of checklist by the lightswitches in each room. I tried that & our lists seemed to fall down &/or disappear.


I found these hooks that have a sticky top(found in the hardware section) and thought they would be perfect to actually stick on the lightswitch(lightswitches are inexpensive to change later if need be). I added a letter to the top and applied it to the lightswitch. Then with pliers, bent the hook towards itself so the pocket wouldn't fall off as easy.


Since its plastic the dry erase markers work very well. When they are done with that certain job in their room they just fill in the block with the dry erase marker. Go here to print one.


o look at the Cleaning Checklist all week long, we will have another piece of paper in front. They can choose to put their favorite quote or scripture they are trying to memorize(each week to go with our FHE lesson we have scriptures to reflect back on that lesson).

Pin It

Tuesday, January 11, 2011

The {SPECIAL} Place

Lately our children have had a challenging time putting down the the ipods and (shared) cell phone until their work( homework/ chores, etc.)is done. So to help them remedy this problem my husband suggested this solution. I'm hoping that the phrase "out of sight, out of mind" will apply.

I already had this little zipper purse to use to put them in when they get home. When they are all done with their "work" they can pick them up because they have "earned" them back. I'm going to love not sounding like a broken record.

Pin It

Monday, January 10, 2011

Happy New Year, 2011

Happy New Year 2011, Friends!! I am sorry that I haven't posted as much lately. I've been working part-time with a very inconsistant/unpredictable schedule, (substituting for the schools) which makes it hard to plan anything extra during the week. It can get a bit overwhelming at times!

I just got a new calling in my ward as the Primary Chorister, so I've been spending lots of time planning out my music schedule for the year. I love to go to Sugardoodle and TheIdeaDoor for ideas with primary music time.

I'm also trying to get more organized at home. So I made a new dinner menu and am working on getting back into couponing. I'm so grateful to FabFrug for helping me with my coupon/money saving endeavors!

I've also got a lot of weight to lose this year, so I'm getting ready to start getting my behind in shape as well. I'd like to find a friend and a Zumba class nearby. Have you tried Zumba? It is SO much fun!!

Pin It

Thursday, January 6, 2011

{Gift Giving} Binder


I made this binder so I can keep track of all the celebrations we need to Give Gifts for. Often times I will make a gift but sometimes I buy one or just get one from my secret "stash" hidden in our room(good buys I found at discount stores or items that had discounted prices).


To put in the monthly tabs, I printed out a calendar to record all the Birthdays, Weddings, or other special Events. The nice thing about the calendar is that you can write in the little box: the recipient, & the gift item (date is already there). Then you just print one up each year and tuck it into the binder in front of the year prior. This way from year to year you know what you've given so you have a less chance of repeating a gift(unless its a gift card-I don't know who would pass those up!)


For December I added an extra pouch for Christmas gifts(to family/friends/neighbors). I try to take a picture & place it in there also.


To remind myself I put all the events on our big calendar(color coded of course). I stamp a birthday image so that it stands out a little.

Pin It

Wednesday, January 5, 2011

List for {Food} Shopping

Now that I have all my meals in one binder for the next month I thought I'd share my Grocery Shopping List I take with me & put on my clipboard(which now I'm thinking of getting the bigger size because folding the list in half is a pain).

Go here for the printable. {this is my first time using this site for printables so I would love some feedback}

Pin It

Tuesday, January 4, 2011

Being Prepared for {Mealtime}


After this & this attempt of getting mealtime organized last year, I'm hoping this 3rd idea will be a "charm". Now that things have changed in our lives (yet again) I'm trying to make adjustments to be Prepared for Mealtime as well.


I got a binder & used these tabs I already had. I just altered them with numbers 1-31 for each day of the month. I wanted them separate so in each tab I could add[Breakfast/Lunch/Dinner/Dessert] Recipes.


I then copied recipes from cookbooks and magazines to put in each day. (Thanks Fabi for this idea!) And labeled (You could just write the name of each meal but I thought it would be easier to put a sticker on. I did 1/2 circle stickers because I love to color code anything - green=breakfast, yellow=lunch, red=dinner, blue=dessert)them for each meal. It will be great to take a couple of days at the begining of the month to prepare & then go shopping 4 times during the month(I think Saturday night is perfect!). I'm hoping this will help in the "food going bad" department.


I printed off a calendar & labeled each day of the week a type of dinner.

Sunday: Crockpot Meals
Monday: Freezer Meals
Tuesday: "S" Meals
(soups/salads/sandwiches)
Wednesday:Anything Goes
(casseroles/meats with side dishes...)
Thursday: Family "Favorites" Meals
(meals our kids ask for frequently when I didn't have anything prepared)
Friday: Finger Food Meals
(foods on sticks/burritos/pizza/nachos/fries/nuggets...)
Saturday: Leftovers
{Desserts are filtered in throughout the month}

I'm excited that for 5 days a week we will be able to try new recipes. If our family ends up liking the recipe I can just add it to our "Favorites" Recipe Binder.

UPDATE(1/11/11): I have been doing this now for one week and finally I have a system that works for me-it is Heaven!
Pin It

LinkWithin

Related Posts with Thumbnails