Wednesday, July 28, 2010

Camping Scavenger Hunt For The Kids

We have a camping family reunion soon, and I was asked to make up a little scavenger hunt activity for all the children. The little cousins range in age from 2 yrs to 11, so I had to come up with something suitable for everyone. I went online searching for ideas, but just couldn't find exactly what I was looking for.

The little cousins can't read yet, of course; so I came up with my own scavenger hunt list with pictures that they could understand. Since this was just a family activity, I just Google Image searched for the pictures I would need.

HERE is a FREE copy for YOU. Enjoy!!
(Click on image to enlarge)

Anyway, I made this picture list, printed it off, then attached it and a pen to a paper bag. Fun!

*Here's a list of what's on my chart above
(row-by-row from top-to-bottom):
Pine Needle
Green Leaf (extra points for biggest and/or smallest)
Brown (dead) Leaf
Plant with Root
Leaf Eaten by Insect
Sharp/Rough Rock
Tree Bark
Smooth Rock
Pine Cone
Acorn
Wildflower (extra points if you know the name)
Wild Berry
??Treasure not found on list!??
Blade of Wild Grass
Tree Twig
Empty Pop Can
Broken Glass
Plastic Wear (extra points if find all 3)
Bottle Cap
Plastic Water Bottle
Coin
Bug/Insect ((include small 'sauce' container w/ lid from restaraunt))
Piece of Rope
Bullet Shell or Casing
Bird Feather

*Update: 8/5/10 FAB RESULTS! We did this with the kids at our family reunion this last weekend, and it went over very well! The only thing I wished I'd done differently was to add "or pop can tab" to the spot with "bottle cap" (pic below). Anyway, the kids had a blast searching for the items on their scavenger hunt lists. The older cousins (as well as parents/grandparents) got to help the younger ones. It was an all-around great activity for our camping reunion. My sis-in-law even gave out prizes at the end to the ones who found the most things.


Pin It

Tuesday, July 27, 2010

Summer Snack


Our kids decided to try their idea of freezing some Grapes for a snack a couple of years ago. It has become one of their favorite summer snack(besides popcycles). And such a blessing on those hot summer days. I even look forward to eating some!

{Just wash them & place them in a pan to chill for at least 2 hours before eating} ENJOY!
Pin It

Monday, July 26, 2010

Adventures in Homemaking

I have a friend named SUESAN (who recently moved to Ohio) that is extremely talented when it comes to taking something OLD and turning it into something new an BEAUTIFUL. She finds things, like furniture and decorative items, at yard sales or thrift stores and brings them back to LIFE! Some people just have a knack for this kind of stuff, and Suesan is one of those. The woman is TALENTED!!

Anyway, I'm thrilled that she has created a new blog called Adventures in Homemaking to showcase some of her projects!! Go check it out and get INSPIRED!!


Pin It

Saturday, July 24, 2010

Best Children's Clothing Store In These Parts

And the award goes to...
I am pretty partial to this store, myself! 
Way to go OMB!!
Pin It

Thursday, July 22, 2010

School Supplies

I know its early to be thinking of school supply shopping but I have found that mid July is the best time to buy. Great prices and selection. We shop at Walmart & second hand stores for the best deals.

Every year before I go shopping with the kiddos I make a School Supply List. I check their school website for the supply list and then make my own.


FRONT:At the top I put each of my child's name and under that is the supplies they will need. If a child needs the same supply as another I put that item on the same line as the other child's. Then I just go down the list in order and tell each child what they need to grab. {Its beats doing one child at a time}.


BACK: I write down backpack, lunch tote, clothes, shoes totals. I add it the front total to see how much I spent for this years school items.

I love that I have all the info on 1 sheet for reference. It is such a HUGE time saver! Pin It

Wednesday, July 21, 2010

Birthday {Countdown}


Our little girl is turning 8 this year. In preparation she's using our Birthday Countdown(inspired by my sisters'-Fabi). Each day they slide over a bead from one side to the other.

I cut a piece of wood 11 inches x 5 1/2 inches. Drilled 2 holes on the top, one on each side for the white copper wire(23 inches in length found at Home depot in the electrical dept.), then put the beads on and glued the wire in each hole.


I cut out the wooden hat, present and cake then painted them white. I glued (mod podge) paper to the front to decorate it. then sanded the edges.

They like to let me know each day how many days are left. Pin It

Tuesday, July 20, 2010

Who Goes First? Idea #1

In our family we are often faced with which child gets to do something first. For example: this week I took each of the kids individually school clothes shopping. So to help in this endeavor I use my trusty Wooden Coins(found at Michaels or Jo-Ann Fabrics).


I put the coins in a dark container & then let the kids pick a coin out{not letting them look inside of course}. the number they receive is the order in which they will go.

I took colored permanent markers, drew the numbers(each coin representing each child) on both sides & then colored the edge of the wooden coin. After the marker is dry, spray a clear protective coat to both sides.

I love that these coins keep the peace between siblings{and MOM}.

Pin It

Friday, July 16, 2010

A Random Act of KINDNESS

I feel HUMBLED by today by RANDOM ACT OF KINDNESS that someone did for ME this afternoon.  I just had to share...

I pulled up to the Maverik gas station (on Cherry/Linder in Meridian, ID) and pulled up behind a lady (in her 50's or 60's) pumping gas into a pretty red car.  She finished at the pump and walked inside to pay for her gas, or had she already paid for hers at the pump?

She came out, looked me in the eye with a quick, sweet smile, got into her car, and drove away.  I pulled up, got out with my ATM card ready, and was puzzled as the screen on the pump said "Lift Nozzle and Pump Fuel".  After a second of wonder, I obeyed the screen and put the nozzle into place.  The screen read $10 and the gas began to spew into my tank.  WOW. 

This woman did something SO KIND for someone she didn't even KNOW, and for NO REASON at all.  And she didn't even stick around to recieve recognition.  I can only hope that she finds this blog and reads this post.  Thank you, kind lady.  God bless your sweet soul.   Pin It

Tuesday, July 13, 2010

{Happy} Traveling


I love to travel to see different sites but traveling with 4 kids its a bit of a challenge. You always hope it will be a peacefull ride with not too many of the "when are we gonna be there?" questions. I was inspired to add to this great idea (by Carlene Tanner) to our family trip (Lincoln City, Or)this year:
The Mary Poppins Bag.


I made these road marker signs from my Cricut. Then I laminated them for durability and to be able to use dry erase markers. [It will be nice to be able to use them over again]. I wrote the mile number but they seemed a little confused so I told them to look for the next city name that was coming up.


Spray paint some clothespins (from Walmart) to match the mile markers.


Using ribbon, hang the mile markers with the colorful clothespins from one side of the car to the next.


My Mary Poppins Bag(sorry for the blur). I found this one at Goodwill, the second hand store, for $2.50[a half price deal]. I love that it had zippers & was big enough to fit all the goodies{coloring books, different games, magazines, mad libs, legos & bubbles}. I would mention "Mary Poppin Bag Time" and they would get all excited. In about all the 17 hours of traveling they only watched about 1/2 hour of a movie(unlike all the other trips which is ALL TV time). They either slept or made use of their "surprises". Before the next trip though, I want to jazz up the bag. I think I'm going to add "city" stickers-names of all the places we visit. It will be fun to see it "covered".

Just some of my other favorites of the trip . . .
Day of Shopping.

Sink full of Crab(caught by my loving husband). YUM-O!

Chasing the Waves.

Checking out a [137 yr. old] Lighthouse.

I love how beautiful & peaceful the beach is. It is so calming.
I'm so Thankful this was such a great trip.

I hope you are having fun this summer with your family. Happy Trails! Pin It

Great Deal!


I know the 4th of July is over but I just had to share this Great Deal. I found these "poppers"(the ones you throw down on the ground and they pop)at the Dollar Store & they worked great! We got 150 poppers in 1 box for $1.00 vs paying $1.00/100 ct. at the firework stands.


I'm sure to do this again for next year!
Pin It

Monday, July 12, 2010

FIVE FABulously Amazing Women


I just wanted to pay special tribute today to five amazing women in my town. They are the FAB FIVE FruGALS from FABULESSLY FRUGAL. I've gotten to know Cathy (creator of FabFrug) a little over the past couple of years (mostly through blogging, facebook and emails) though we don't often cross paths in person, and she is truly an amazing woman. I don't know how she does it all... But she does!! And Monica (co-founder of FabFrug) is equally as awesome.

There are now FIVE of them contributing their time and knowledge on the site. I appreciate all of the TIME they spend keeping us informed and helping us SAVE MONEY and LIVE more FRUGALLY. Their site is always the FIRST place I go to find the latest DEAL out there.

This last weekend these FIVE women put on FabFrug's 2nd annual "Pay it Forward" benefit garage sale to help some deserving families in need. They reached out to our community and blog/websphere in a plea for help to make this event a success for these families. My parents had the privilege of helping in this event, and were touched by these FIVE FruGALS' sincere desire to serve others. My mom said, "They were all such neat girls!" ...and talked about what an honor it was to serve with them for such a wonderful cause.

You can read about the event here and here. Truly an inspiration! Love u FAB FIVE!! XOXO

Fabulessly Frugal Pin It

Friday, July 9, 2010

Check out Last Plea for Help!

Check out Last Plea for Help! Pin It

Motherhood: An Eternal Partnership with God

The last couple of weeks have been filled with back-to-back lessons, appointments, chores, and summer activities. (Not to mention my computer got a virus on Tuesday and is finally fixed. And Heather is out of town all week.) Sorry for the lack of posts this week. It's a crazy time in life as a mother. But I'm having a fun summer with my kids and family! What could be better than that? I'm sharing a little video with you that really touched me. We ARE doing what's most important. We are raising and teaching children of God. It is worth our TIME. Have a fabulous weekend!!

Pin It

Monday, July 5, 2010

Hoody Towel {Tute}

Over 2 years ago I made each of my kids a hoody towel.

First of all...
*The reasons why I LOVE these towels:
-They are super QUICK/EASY to make
-They are super inexpensive
-They are durable and super functional
-They hang nicely on a hook
-They make great gifts!
-You can customize them to your prefrence


*The reason I only buy WHITE towels:
-I read in a motherhood book once that white towels are best because you can wash them all together, and you can {clorox} bleach them. I've been using white towels ever since.

To make a hoody towel, you will need...
-One Bath towel
-One Hand towel (really half... must cut)
-Ribbon if you want to dress it up a bit
-Seem ripper, scissors, sewing machine, pins, etc
(Every one of the above items can be found at Walmart! That is where I bought my towels and ribbon.)

How to make these wonderful things...
1- Fold hand towel in half (from end to end) and cut in half on the fold.

2- Rip out (with seem ripper) the hem at the end of the hand towel.

3- Fold edge down (wrong sides) to match up with the end of the design on hand towel.


4- Sew down with a straight stitch.

5- Fold in half (right sides together) so the cut edges match up.

6- Stitch along the raw (cut) edge.

7- Now fold into triangle like this...
stitch across the tip like this...
and trim off top...
Turn right-side out.

8- Time to pin the hood to the towel. Find the middle of the bath towel and hood. Match up edges (right sides together) and start pinning in place (starting from the middle).

I fold in a couple of tucks on each side of the middle point (which is optional).

Here it is all pinned up and ready to stitch...

9- Sew on the hood.

10- To give it a finished, cleaner, edge and stronger hold; fold the sewn edge up toward the hood and stitch a quick seem.

YOU'RE DONE!!

FUN VARIATION:


Dress your hoody towel up with RIBBON!!
(You will need about 2 1/4 yards of ribbon if you are doing the hood and both ends of the towel.)

When doing this variation, be sure to sew on the ribbon FIRST THING (at least BEFORE step 5).

Have fun with these!!

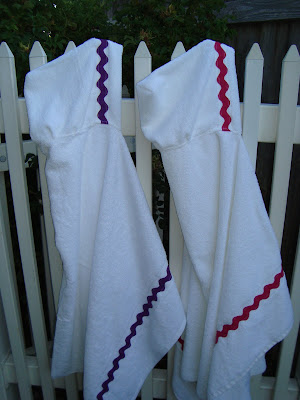
Update 7-12-10: I made these cute matching towels for my little nieces' birthdays that were the same week...

Also, Walmart has some fun bright summer colors right now as well!
(Wow. Just yesterday the shelves were full of these. Today not even close!)


Pin It

LinkWithin

Related Posts with Thumbnails