Friday, May 7, 2010

Teacher {Appreciation} Gifts

I didn't have much time this week but I wanted to do something for our girls' teachers for Teacher Appreciation Week. I know I have probably already said this but . . . In my opinion teachers do not get paid enough for what they do! I take the many opportunities to let them know how much they are loved. So for this special week's gift I made Hall Passes for their classrooms.


Personalized Hall Passes.


Must have Chocolate Bar with a thank you note from each child.


Blank wooden letter.


I traced, cut out & then glued some felt to the back of the letter. When I cut the wood it split many times and I didn't want the kids to get splinters. If you were to buy your letter in the store you probably could skip this step.


I spray painted it and stuck a shower curtain ring in the drilled hole for hanging. I wanted to make these a little bit cuter with beads and more fabric but today it just wasn't to be. I think they'll still do their job. Pin It

Wednesday, May 5, 2010

Turning {4}


Our little boy turned {4} today so to celebrate we went to IHOP for breakfast.


And I always put out our Birthday Wreath on the front door so everyone else knows also. (I got this wonderful idea from Carlene Tanner-its one of her familys' tradition)


1-Straw type wreath.


2-Take "U" shape foral pins. Put the balloon in about 1/2 way. . .


3-And poke it in! I didn't put all the pins the same way, I crisscrossed them as I went around the wreath. This wreath has over 1000 balloons. Good thing for "bulk" packaging.


4-You can add some other finishing touches by adding picks and streamer ribbon.

I love putting this wreath out but I think eventually I will make one for inside the house. I love looking at it-its so birthday festive!

*Update: There is also another way to make this wreath! (Angela's version HERE) Pin It

Tuesday, May 4, 2010

Mother's Day Brooch


I found this cute idea and decided to make a brooch for my mother for Mother's Day. It was so easy to make and so CUTE!


1-Trace a circle on the fabric using a cup.


2-Pin right sides together and stitch around the edge.


3-Turn inside out and iron flat.


4-Fold at the bottom. Stitch to stay. (For the next flower I think I'll fold less over.)


5-I glued mine to a wooden disc(folding a little under).


6-Finished gluing.


7-Cut a smaller circle, cut slits and fray edges.


8-Glue a metal accent for the middle(I got this piece from a belt).

Now I'm so excited to make me one to wear this Sunday! Pin It

Monday, May 3, 2010

New Poll- What's Everyone Driving??


What kind of "Family Cab" do YOU drive around in?
Go vote in our new poll on the left sidebar. Feel free to share your thoughts on this post!!

Here are my thoughts...
Right now I drive an SUV, which I do like (esp. because it's paid for!). But what I'd really like to be driving... a decked out Honda Odyssey with all the bells & whistles... auto sliding doors, rear camera for backing up, leather seats, stow-n-go, navigation... ahhh someday.

Some gals I know wouldn't be caught dead in a van of any kind! They are missin' out in my opinion. My cousin, Holly S., is one HOT mama [of 6 kids, mind you]- (those of you who know who she is would most certainly agree with me!) And guess what she drives?? A big ol' 15-passenger van. When she steps out of that thing in her stilletos, I just wanna say "YOU GO GIRL"! Pin It

April 2010 Poll- When Do You Get The Most Done?

As a homemaker, when do you get the most things done??
56 Votes

Early Morning (before kids get up) 13 (23%)
Mid-Day (during naptime) 20 (35%)
At Night (after kids are in bed) 31 (55%)
Pin It

Saturday, May 1, 2010

Reinvented Apron


We have a Concession Business (Crepes among other things) and today we went to the Farmer's Market downtown Boise. My husband is the one who makes the Crepes, I just ask customers what they would like to order. I just had to share the cute {reinvented} Apron I made to wear.


1-I took a woman's dress jumper and a kids skirt.


2- Cut the jumper up each side so you can use the front panel.


3-Cut the front and use the top half.


4-Cut the skirt apart(in back).


5-Sew on a pocket. I like ruffed up edges so I did a "backwards" pocket.


6-Thread a ribbon thru the belt loops and sew on.


7-Put beads at the end of the ribbon and tie off.


8-Stitch around whole thing so it looks like it was meant to be.

For around the neck:

9-Cut a piece of fabric (2 strips) longer than a piece of elastic.


10-Pull the fabric tight as you stitch.


11-Magic! A gathered elastic neckstrap.


12-Tie a knot thru the button holes. Pin It

Friday, April 30, 2010

Dishwasher {MAGIC}

Sharing a BIG dishwasher tip: Dishwasher Magic.
This stuff truely is MAGIC!
I am so excited to have clean dishes! A few months back our dishwasher started to leave a film & left over food on the "clean" dishes. I've had to handwash and its not fun when you have 6 people using the dishes. We had a repair man come and he told use we have hard water and a water softener would be great ($1500.00-$2400.00-too much right now) but then he did mention to give this product a try. That was one of the best $4.00 (Walmart)we have spent! I will be doing this once a month(recommended) to keep our dishes clean! Pin It

1 Year Advice


The other day as I was going thru our wedding memorabilia I found letters of advice that I could only open 1 year after we were married. So I decided to put them in a book for safe keeping. This was a great idea my aunt had for the Bridal Shower but you could easily do this for a Baby Shower for a new mom!


1-Cut 2 pieces of fabric and 1 piece of Heat n' Bond all the same(mine measured to fit 5x7 sheets of paper).


2-Iron the Heat n' Bond to one side of the fabric.


3-Remove paper sheet.


4-Put other piece of fabric on top and iron (this will give the "book cover" durability).


5-Stitch around all 4 sides. Fray the edge.


6-Stack paper on top of fabric (depending on how many letter of advice you received).


7-Tape in all the "advice" papers on each colored "page".

Now after 12 years of marriage its fun to reread the wonderful advice given and see how I have done. I will cherish these always! Pin It

Thursday, April 29, 2010

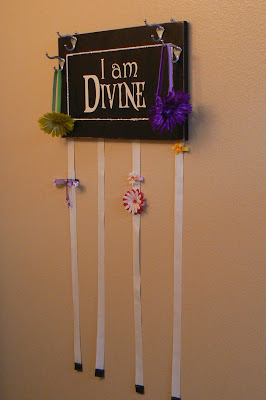
Hair Accessories Holder


I was so inspired by Angela to make some hair accessories(thanks Ang!) that I needed to make a holder for them.


1-A cupboard door (a picture frame would work also) with a beadboard insert.


2-Spray painted it black.


3-For the ribbon part: Fold a piece of fabric(4 inches in length) in 1/2 and put the ends into the middle then put the white ribbon in between them.


4-Sew around each side forming a square.


5-Glue the ribbon onto the back of the board.


6-I did a bead of glue around the edge then sprinkled it with glitter.


7-I love how the vinyl lettering came out: "I am Divine". I love what the word "divine" means. I wanted my girls to have a daily reminder that they are Divine (the pretty hair clips are just a bonus). Then in the top corners I put some hooks for the headbands. Now all I have to do is make some more hair clips to fill up the ribbons. I'm so excited. Oh, the possiblilities! Pin It

LinkWithin

Related Posts with Thumbnails