Friday, March 12, 2010

Eye Catching Headboard

My friend Katie asked me to decorate her Master Bedroom Headboard Wall and I jumped at the opportunity. I love doing Design. Its fun to create a space that is uniquely yours. She had ideas of a focal point with different woods and branches with birds. So I designed the wood art piece, built it and painted (along with Katie) the branches with the love birds. It looks so Wonderful, I just had to share.


I put their initials to make it more "theirs".
Pin It

Thursday, March 11, 2010

Family Traditions

Since the beginning of this year, Heather and I have decided to focus our posts on a different theme each month. March's theme is on Family Togetherness, so this is why we have shared our FHE charts and some fun family games and traditions.

James E. Faust, May 1983, said:
"Develop family traditions. Some of the greatest strengths of families can be found in their own traditions." (found through Carleen Tanner's parenting class outline)

Here are the reasons we must create family traditions: (as taught in the wonderful parenting class by Carleen Tanner)

We ALL have these basic human NEEDS:
1. A need to BELONG
2. A strong sense of IDENTITY
3. ACCEPTANCE by others
4. Emotional & physical SECURITY

Family Traditions can:
1. Bind hearts & give fam. members a sense of identity
2. Connect family members to heritage
3. Remind family members what they stand for
4. Acknowledge & celebrate important events in the lives of fam. members
5. Give a sense of security & continuity
6. Cement people together as a family unit

TRADITIONS are so important to me and my family, and SO MUCH FUN to create and implement as something special and unique to US. I hope you will share some of your special family traditions with us as well! Stay tuned... On Monday I will share with you my family cheer/song/motto and mission statement! ♥ Pin It

{Our} Family Motto


We love our Family Motto Board because we came up with it together. We each took our beginning initial {the funny thing is that it actually spells something} and decided what it would stand for and what we wanted to aspire to. President Hinckley's "Be's" were a great inspiration. I know this will unite our family because we have the same goal to be. . . . . . Worthy, Humble, Artistic, Athletic, Achieving, and Teachable.


1-I first spray painted the board Black then Cream. Then I used the negative of a vinyl piece as my template.


2-Then I sprayed painted the lettering with Dark Brown.


3-I sanded the whole thing down to give it that "aged" look (even over the lettering). Pin It

Wednesday, March 10, 2010

My {LUCKY} Charms

I am blessed with 4 Lucky Charms. I love the word "LUCKY". We truely are lucky to live in this country and have the freedoms we have as a Nation and as Women.


1-What a lucky deal I found at Home Depot. I went to their wood bargain bin(in the back) and found these 7" x 48" pieces of wood for only .51 each. I cut this square into a 7" x 7" block.

2-I cut some heavy duty wire(I think I found it in the fencing materials at HD) into 2 pieces, 16" long. Then fold both of them in 1/2.


3-Drill a hole in the top to fit your wire in.


4-Curl wire (for the pictures) with a dowel.


5-Cut a piece of fabric to fit the block and Mod Podge it on.


6-Hot glue the wire into place.


7-Finish with vinyl lettering(I did green glitter on the shamrocks) and place pictures in the wire coils. I also attached some ribbon to the base of the wire.

Pin It

Tuesday, March 9, 2010

Button Rings

I love Rings. They are so fun to wear and the bigger they are, the better. Although right now I can't afford bying a bunch of those big rings so I decided to make some.


1-I had all the buttons but found this elastic at Goodwill. I've had a hard time finding the ring base at the craft stores(and I didn't want to send for one) so I had to go another route. Elastic!


2-Measure your finger leaving 1/4 inch excess.


3-Handstitch together. Start by going in from the top.


4-Leave and end.


5-Stitch over the top of the end piece.


6-On flap end go thru so you can load the buttons.


7-Load buttons.


8-Go thru other side of button hole back to the elastic.


9-Stitch thru the back a couple of times to finish it off.


10- Great for fingers. . .


and toes {for summertime with flip flops}!


You could use different colored elastic, beads or buttons-the possibilities are endless!
Have Fun! Pin It

Monday, March 8, 2010

{Lucky 100} Game

For our activity for Family Night we are going to play a St. Patrick's Game I made up last year.

I altered some green dice {found at Big Lots} with white labels and St. Patrick's Day stickers. Each dice matching. The container I found for .30 at Goodwill.
The object of the game is to be the first one to reach 100.
RULES: Each player rolls the dice and counts up the points. If you roll a double you get double points.
Hat= 2 pts.
3 leaf clover=3 pts.
4 leaf clover=4 pts.
leprechaun=5 pts.
horseshoe=10 pts.
pot of gold=15 pts.


Best O'Luck!
Pin It

Jill Gives Me HOPE!!


Please allow me to introduce you to my friend, Jill Knapp. She is from my town and was recently on the Dr. Oz show last week! She has allowed me to post her very inspiring story of health and weight-loss. Jill is a 42-year-old mommy of 3, and has recently lost 100 pounds over a 2-year span.

I want to lose weight SO bad, but whenever I start to climb that "mountain" the top seems so unreachable and I fall back down. It can be so discouraging as a mom, with so many other people and things to worry about every day. Many of us tend to put everyone else first and ourselves last. I am one of those, and it's trying to kill me; as I am insulin resistant and on my way to Type II diabetes, myself.

Jill has brought me a little spark of courage, and the inspiration to get back up and try again. She brings me hope! Read her story and be inspired with me. Then leave me a comment or email me (TheCreativeHomemaker AT gmail DOT com) if YOU would like to join me in my journey to lose weight! WE can use ALL the support WE can get!

Jill's Height: 5'8"
Before weight: 237

How I gained it:
During my first pregnancy, I gained 50 pounds. With 2 more pregnancies and many miscarriages my weight gradually began increasing. As with most women, I became wife and then mother and got so busy with life that I forgot the importance of taking care of myself. I was young, and my body didn't feel the extra 100 pounds I had gradually put on over the years. I had bad eating habits, no time for exercise and no real desire to be healthy.

Breaking point: I was diagnosed with gestational diabetes with my third and last pregnancy at age 37. I was having headaches after the pregnancy and just not feeling well, I thought it was from having a sick newborn. Finally, at six months, I went to see the doctor to be checked for the headaches, and I found out I had put on 15 extra pounds. It was so depressing. I also found out I have Type 2 diabetes that was even more depressing. I was determined right then that I was going to get the weight off, and I did! My husband and kids mean the world to me. Being able to live a long life was an important factor and motivation to lose the weight. In January 2008, I even broke my ankle on both sides after slipping on black ice, I had to have surgery and 6 screws put in my fibula. I was still so determined I was still able to lose the weight. My mind was made up that no matter what, it was coming off.

How I lost it: I logged my food, ate six small meals a day and had no refined sugar. Finding out I had Type 2 diabetes helped me have a paradigm shift in the way I think, and I did a lifestyle change versus a diet. Four days a week, cardio mixed with weight training was my exercise routine. In January, I had a personal trainer sponsor Rebecca Carington training sessions to get ready for the Mrs. Idaho pageant. It was wonderful to learn from a trainer, she really cared about me and saw the potential I could reach and I did.

I did the Mrs. Idaho pageant after losing a total of 100 pounds, and I made the top six out of 16 amazing women. I am now a motivational speaker to motivate others to lose weight and get healthy. I am a diabetes advocate. It brings me great joy to share my story with others -- and in doing so, I inspire them to "get up and get moving!"
After weight: 137


Visit Jill's web site www.getupandgetmoving.net to get motivated today. Pin It

Sunday, March 7, 2010

A Blog Award for Heather & Me??

Wow... I'm speechless!! Thank you Vicki for this cute award. We're honored, and will proudly display this on our blog!

You'll have to go check out Vicki's cute blog. She is another creative kindred!! Pin It

Saturday, March 6, 2010

Weekly Menu


I had an "aha" moment last weekend with my recipes. I have a bunch of magazines and cookbooks I want to try recipes from so I decided to pick a couple and use sticky notes to attach to the pages. I write "Monday Breakfast" (one for everyday of the week for breakfast) and then "Monday Dinner" (one for everyday of the week for dinner). "Poof" My menu is planned for 2 weeks. Now all I have to do is make my shopping list and go buy the food.

I tested it out this last week and meal time was so much less stressful. What a plan!
Pin It

Thursday, March 4, 2010

Ang's FHE Board & Wheel

Isn't Heather's FHE board awesome? Everything she touches turns out absolutely beautiful. She is so lucky to have a vinyl cutter, and let's her creativity go crazy with it! I do not have a cutter, but I get by okay without.

Here is my FHE board...

I created this wheel about 3 years ago, and it has worked out wonderfully for my family!! I ALWAYS use clipart for all my charts, because it helps the little ones who can't read yet. Hence the reason I created this one. It's made out of cardstock, laminated, and has magnets on the back for sticking up on the fridge or whiteboard (as is above). And it's totally easy to make!

Here's how:
First grab the right supplies, including 12x12 cardstock (can use 8 1/2x11 for the top one).
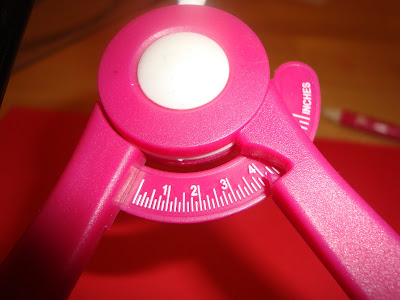
1- Draw circle with this tool (forgot what it's called). I set it at 4 inches for the top (smaller) circle. Hold the tool in place with one hand and turn paper around with other hand. *Mark where you had the center-tip of tool!


2- Now use the protractor and place the center exactly over the dot in the middle. For 6 sections, put small guide marks on "0" and "60", then the next "60" and next "0". Then rotate the tool and be sure to measure/space between the 60's and 0's.


3- Now you are ready to use the ruler and connect the dots to make your 6 even sections.

4- Cut wheel out along the outline of the circle.

5- REPEAT all steps for the larger circle, this time setting your circle-making tool at 1/2 inch bigger than the smaller one (mine was set at 4 1/2 for the bigger one).

6- Look through old Friend magazines for cute illustrations to cut out and glue on. (You might have to color-copy to resize the picture.) There is also some really cute clipart that you can find on Sugardoodle.net.

7- Now label each section by either typing/printing/cutting out/glueing on the words, or vinyl lettering, or just writing the words under each illustration. *Also write family members' names on the bigger (bottom) wheel.

8- Laminate!! Then poke holes in middle of each circle. Put together with a big brad button (mine is 25mm). (I got vinyl letters to say "FHE" on the brad button.

9- Stick some magnets on the back and you are done!! Enjoy! Pin It

{Love 40} Block Game

Our family loves to play this Block Game. We will play this after FHE or if we just need a quick game.

I cut 6 square blocks {one for each member of our family} from a 1 1/2 inch x 1 1/2 inch board. I sanded them (I didn't paint them because I love the look of natural wood and it would probably rub off anyways). Then on each block I put all our names in vinyl. We have 6 members so it works out great. If you have more you could double up the names and if you have less then you could put more hearts. I picked a name and put 1 heart on that name for each block.


We use this container for storage and then for shaking up the blocks. The object of the game is to be the first one to get to 40 points. Each person will shake the bucket with the blocks and dump them out. That person will look at the top of the blocks and if they see their name they get 2 points for each block. If they get the side that has the heart they get an extra 5 points.


We usually have to leave extra time because we end up playing it 3 times. FUN times! Pin It

Tuesday, March 2, 2010

{Our} FHE Board

Our FHE Board is hung in our living room to use and remind us that Monday Family Night is so important in building our relationship as a family.


The board measures 20 inch x 24 inch.
The top 6 inches = our name,
the next 9 inches = a magnet board where we put a scripture, quote or topic title that go with that weeks lesson and a picture of Jesus (which I just took a calendar and laminated a picture to rotate for every month of the year).
the last 5 inches = FHE jobs (using scrabble tiles & Shrinky Dink)
Our board works even though our little boy(who is 3 1/2) tends to rotate our little faces often. I love that in our family we have chosen to make it a priority to spend time together and build that bond that will last forever.
Pin It

Emergency Preparedness

image borrowed from Hampton.gov

I got released from being the primary pres at church (can you tell, since I've been posting more often?), and am now the Emergency Preparedness Specialist (hence my posting lag this week). BTW, did you notice the new poll on the top left?

I've been given the assignment to put together an EMERGENCY PLAN for our ward (which would cover a geographical 1/2 square mile where I live, but may differ in other wards/areas). Yes, LDS people have always been taught to be prepared. It's something that I've lived with my whole life... food storage, homemade whole-wheat bread, a fanny pack with a 10 essentials survivor kit, and many family training sessions on survival and emergency planning, put on by my very outdoorsy father.

Now I'M the mom, and working on getting my own family totally prepared for a "rainy day". I'm not completely there yet, but getting there... and it's a wonderful feeling!! I am very excited for the task I've been given and hope to make it a success!

My vision is to include (optionally of course) the whole 1/2 square mile of neighbors, whether members of my church or not. Everyone could benefit from each other's help and skills in a crisis situation. I have found a ton of great info from the Internet, family and friends. But I would still like some more input! I want to know what works, and if you have a neighborhood emergency plan in your area! I'd also love to hear some tried/true personal survival stories!! Please comment or email me if you have something to share! TheCreativeHomemaker AT gmail DOT com. Thanks so much!!

♥ I will share with you what I do along the way! Pin It

LinkWithin

Related Posts with Thumbnails