Friday, May 27, 2011
Pink {Pink} Pink
Road Signs: MDF wood with paintable wallpaper (both sides)
Hair Cuties{#1}: made from Chiffon & Netting Fabric.
Cut circles from the fabric & netting. Burn the edges with a lighter-be careful not to get too close. They will curl up like a rose petal. For the center, I used a sytrofoam ball cut in half and glued a string of pearls onto it.
Wednesday, May 25, 2011
Summer Necklace
I was in Walmart the other day and saw a cute Necklace. I couldn't pay $8.00 knowing I had all the stuff at home to make it. The technique seemed so simple & I knew it would look cute wearing it in the upcoming summer weather.
Necklace clasps
Fold string(4 yards-I used thin hemp like) in half, thread one through the necklace clasp and with both strings tie a knot.
Take one string and thread on a bead or shell then take both strings and tie a knot. Continue until you reach the end of the string. Tie onto the other side of the necklace clasp. TIP: I put a little glue on one of the string ends so it wouldn't fray and thread easier.
All Done! I made it long so I could wear it by itself or layer it.
You could wear it single or doubled up. . .
Or even layer it.
Saturday, May 21, 2011
{ThumBody} LOVES You
I have been very frustrated lately, not only with life, but my children.
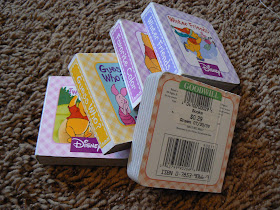
I found these boardbooks at the second hand store(Goodwill) and knew these would be great if I altered them. Right now seemed to be a perfect time to let our children have a little reminder that ThumBody loves them! I sat down to think of the good things about each child. It helped me to gain a new perspective & greater love for each of them.
the plain books. . .
Use a generous coat of Mod Podge then wrap the cut fabric (I used home decor fabric)to fit.
Let the outside dry.
Cut the colored scrapbook paper to fit on the inside. Use double stick tape to adhere it to the boardbook.
Ways I Love Them:
Friday, May 20, 2011
Another one to Try
Mix together:
1 (12oz.) jar almond butter
1 cup honey
4 scoops vanilla whey protein powder
1 cup chopped almonds
2 1/2 cups regular oats
3/4 tsp. cinnamon
1/4 cup ground flaxseed
1/4 cup nonfat dry milk
about 1/3 cup water(just enough to make it stick together)
After all mixed together spread into a 9"x13" pan. Refrigerate overnight and cut into squares. You can get about 18-24 bars depending on how you cut it.
Store extras in the freezer.
Flavor your Meat
I used these marinade packets(on sale at Winco for .48) and added about 1/2 package (dry seasoning)while the meat (1 lb.)was cooking. It turned out great!!!
Now I'm excited to experiment with the other flavors.
Wednesday, May 18, 2011
Coupon Binder Boards
I've been couponing for little while and its great saving money. I figured for myself that the binder system works well for me since its so easy to organize all the coupons. But as I would go to the store I was frustrated that the binder( & the coupons) would slip in every direction on the cart. I was at Walgreens one day & the worker had a simple piece of wood on top of the cart to hold the wall hooks. I new I could make my own version- "Heather style". Here is my Coupon Binder Board.
Cut 3 pieces of wood: 13 1/4" x 21 1/2" (1 of these), 1 1/2" x 21 1/2" (2 of these). Nail & glue them together. Paint. Add a handle to the top piece of wood.
Sew (or cut up a fabric belt at a second hand store) a fabric belt. I found some great instructions here. Attach each side of the belt to the underside of the wood.
I designed this subway art vinyl to adhere to the front wood.
It fits on the cart like this. . .
Ready to stay secure on the board (this was the board before being painted black) for easy carry in.
Here is how I organize my binder:
Each store has a pocket divider & pocket sheet protector.
Categories to file coupons[baking, beauty, beverages, canned, cleaners, condiments, dairy, dry(cereals,boxed items, etc.), frozen, health, household, meats, snacks, toiletries].
I use this paper clip to hold(onto the zipper part) all the coupons I will give to the cashier.
I hope this helps you in your Couponing Adventures.
FYI: If for any reason you can't make a binder board, I do sell these. Please email me: loverde@cableone.net. I charge $23.00 for the finished board (shipping outside of Boise ID area is $16.00 UPS)+ $6.00 for the Subway Art Vinyl (shipping for just vinyl $4.00).
Monday, May 16, 2011
Malt-O-Meal Muffins
Ingredients:
1 1/4 cup all purpose flour( I did 1 cup reg flour + 1/4 cup wheat flour)
3/4 cup Malt-O-Meal dry cereal
1 cup sugar(I think I will try 1/2 cup of honey next time)
3/4 cup milk
1/4 cup canola oil
1 egg
1 TBL. baking powder
1/2 tsp. salt
1 tsp. vanilla
2 medium shredded zucchinis(about 1 1/2 cup)
Directions:
Stir everything together scoop into muffin cups. Cook at 375 degrees for 15 mins.
TIP: I realized this as I grated the zucchini for this recipe. If you cut the tip off one end, you can use the "stem" end as a handle and not grade your fingers.
Since our kids don't want to eat any of these because they are "too healthy"; I put the rest in the freezer & only pull out what I need.
Monday, May 9, 2011
Publish a Group Cookbook
I want to let you all know that doing a ward (or group) cookbook has gotten a whole lot easier, and less time-consuming for the committee! And it is a wonderful fundraising opportunity for the PTA or other organization you're involved in. The PTA did this as a fundraiser for my children's school this year, and that is how I found out the easy way to do a group cookbook.
The most wonderful thing about this company is that everyone in your group/family/organization can contribute and submit their own recipes THEMSELVES! It takes HOURS of work OFF the ones in charge!!
It's super easy to get started. Go to their website and order a FREE starter kit. They will take you step-by-easy-step into this fun project!
Here's my 2-cents worth of advice
(if this is a ward cookbook)...
-Have a small committee. We had just 2 of us- myself as chairperson and another as co-chair. (The RS presidency were committee members, but just for moral support and insight- not expected to do anything.) Designate your responsibilities. (I was in charge of getting people excited about the cookbook, emailing them information, and proofing recipes. Brenda was in charge of passing around the sign-up sheets, making the spreadsheet, collecting the money, and sending in the final order after we filled out the form together.)
-Start with a sign-up sheet for names, email addresses and phone numbers (for those wanting to contribute and/or participate). This will give you their permission to contact them in regards to this project. With that list, start a spreadsheet that you can update and send back and forth between you and the co-chair.
-Email me at TheCreativeHomemaker at gmail dot com if you would like to see the message I typed up and clipart I used to introduce this project to our RS.
-Make sure you clearly explain exactly how you would like everyone to label their measurements. ie: "Please follow the guideline examples given in 'Typensave'." or "Please use 'T' for Tablespoon and 't' for teaspoon." and so on. (This is something I did not do and wish I had. It would've saved me a lot of time in the proofing process!)
-Proof the recipes every few days when you have a second here and there. I waited and did them all at once. Exhausting!
We were able to get 200+ cookbooks with 400 recipes for about $5 each. It's been a success! The money has been collected (the hard part), Brenda and I are alive and well, the order is in, and we are anxiously awaiting our books!!
*Please Note: In our church, these are NOT (and should not be) used as a fundraiser. This is simply a fun, unifying opportunity for our ward relief society. I think every ward needs a ward cookbook every once in a while!
Friday, May 6, 2011
WEED Buckets
Dollar Store (DollarTree) Bucket
When they fill up the bucket they are done for the day. I'm hoping this will cut down on all the whining of "how many hours of weed pulling".
I figure we could all do this a couple times a week. If more weeds need pulling we might have to do it more often. Well see.
Thursday, May 5, 2011
Protein Snacks
No Bake Oatmeal Chocolate Chip Protein Balls
1 cup almond butter, 1/2 cup honey, 2 scoops vanilla whey protein powder(Winco,Walmart), 1 cup oats, 1/4 ground flax seeds(Winco), 1/4 cup mini chocolate chips. Mix all the ingredients together, form into (1" to 1 1/2") balls and refrigerate for 2 hours before enjoying. Yields about 22 balls.
Then I found these (I altered a bit + the no bake ones taste better than the baked ones). . .
Almond Oatmeal Protein Bars
8 oz. fat free cream cheese, 4 scoops whey powder portein(I did 2 of chocolate + 2 of vanilla), 1/2 cup honey, 1/2 tsp. cinnamon, 1/4 cup ground flaxseed. Mix these all together with an electric mixture then add 3 cups oats & 1/2 cup almonds. Mix again. If its too think just add some water. I put this mixture in a 11"x 7" pan. Refrigerate and cut into 12 bars.
No Bake Oatmeal Protein Balls
5 Tbl. peanut butter (smooth or chunky), 3 cups oats, 6 scoops whey protein powder(I did 4 of chocolate + 2 of vanilla), 1 tsp. vanilla flavoring, 1/4 cup ground flaxseed, 1 cup non-fat dry milk, 1/4 cup water(add more if needed), 1/3 cup honey. Mix all the ingredients together and form into (1") balls. Place them on a cookie sheet & refrigerate. Yields about 35 balls.
I decided to store the extras in the freezer(each serving in a snack ziplock bags) in the recycled continers (it will help detour my kids from eating them). Then I can just pull one out when I need it.
I love how these Protein snacks are filling, healthy & dessert like.
Tuesday, May 3, 2011
Tip for Today
My aunt Rena taught me a little tip I thought was interesting: Put OATS in your meatballs!
Last night we had meatball sandwiches. I just added 3/4 cup of old fashioned OATS to 2 lbs meat, 3 egg yolks & seasonings. I put them in the crockpot on low for 5 to 6 hours with sauce to cook. They held together well and tasted great.