Tuesday, August 30, 2011
"FunStuf" for Church
Monday as we were having Family Home Evening from the Friend magazine, I got looking thru the rest of the magazine & found the "FunStuf" page. The thought came to me to take it out & put in the church bag as a reverent activity for Sacrament meeting. [I laminated them so we can use the wipe off crayons(found at school supply store).]
I just keep all the magazines in this drawer for easy everyday access.
Our girls are old enough to listen with intent but our 5 year struggles to sit on his bum. I hope this activity will keep his mouth quiet & his ears open.
Tuesday, August 23, 2011
Nail Color Card
I love the items for girls/women that are FUN & make us feel BEAUTIFUL, like Nail Polish.
Whenever I go to the store & want to pick up a nail color I forget what colors I already have, so I to put it back.
I made this card (library card-found at school supply store) up. Each line has its own set of colors. After painting the nail color on the specific line, I tucked the card inside a plastic name badge sleeve(found at Walmart & Dollar store).
Now I can store it in my purse for easy access later.
Monday, August 22, 2011
Fall Off the Bone {Roast Beef}
We had the best meat for dinner last night!
As a kid we had Roast Beef every Sunday. My mom is a great cook but the roast beef was always dry. My sister & I would always use ketchup to dip the meat. So when I found the secret to cooking roast beef (in my BHG magazine), there were no words to describe how elated I was.
I didn't follow the exact recipe but when my husband will have 3rds I know I did it right.
[My version]-Ingredients:
2 1/2-3 lb. beef chuck roast
1 tsp. celery salt
1/2 tsp. dried garlic
1 Tbl. dried minced onions
2 (14 oz.) cans beef broth + 1 can with water
(liquid needs to cover meat)
Cook in the crock pot for 11 hours on low heat.
Saturday, August 20, 2011
Clean Cut Brownies
Friday, August 19, 2011
Crafts with Oregon Treasures
Thursday, August 18, 2011
Tent Trailer Re-Do's for Others
This summer 4 other families, that we like to spend time with, bought used tent trailers (for great deals on Craigslist as well). This includes 2 of my husband's sisters. So along with my own tent trailer re-do this summer, I also helped those 2 sis-in-laws re-do their cushions and curtains.
We did only the cushions on this first one (Tasha's). I did the plain, heavy-duty canvas on the whole thing and sewed the cute stiped material right in with it. Tasha's husband did an amazing job remodeling the entire trailer, both inside and out!! I will have to hit him up for some before/after pics!!
This other one (Cala's) was a LOT of work, but it turned out super savvy (just like her). Their trailer came with grey and burgandy interior and canvas. We stayed with that color scheme and found a classy black/grey pattern on a nice, thick fabric for the cushions.
We used the curtains it came with, but they were a bit short after being washed and dried. So we found some coordinating fabric, of the same thickness, and I added a 3 1/2 inch valance (border) to the top of each curtain with a matching tie for the middle.
We were all very pleased with our interior "re-do's", and have made them fit each of our styles and personalities. We can definately call our trailers a "home away from home" now.
Friday, August 12, 2011
Travels to Lincoln City Oregon
We just got back from a wonderful family vacation at the Oregon Coast(Lincoln City).
We stayed here. [My families' in-laws rent it out-3 bedrms, 2 bath, kitchen & laundry rm]Its only a couple of blocks away from the beach. So peaceful!
Auri found a Dead crab
Taidan was excited to play with the Dead crab
Aulina's Star Fish
I'm so glad we could take a break from "life", to soak in the goodness that has been created for us to enjoy.
*In one of my next post, I'll show some items we found to make some crafts.
Wednesday, August 10, 2011
Monday, August 8, 2011
My Tent Trailer Project
We bought a 1986 tent trailer a few years ago for pretty cheap on Craigslist. It was not much to look at. The canvas and screen were brittle and shredded in many places. The wood was moldy. It was not well cared for at all. We had our work cut out for us for sure!
My husband found a wonderful website called PopUpPortal.com that helped a lot in our venture. Fixing up this tent trailer has become a hobby for him ever since. He has since replaced the wood, fixed electrical stuff, repainted the whole exterior, rigged up a way to put up our canopy, and several other things. He continues to come up with new improvements every few weeks.
My part in this whole tent trailer project has been lots and lots of sewing!! I spent many, many hours sewing on this thing, so I think it's time for a little "show and tell"!!
My first project was a biggie- the canvas, itself. Something I NEVER wish to do again! We had to take the entire canvas off the trailer since it was all one piece. We bought some canvas that matched and had to tear out and re-do whole sections of canvas and screen. I did it all with just my Kenmore sewing machine! (Of course I had to use heavy-duty needles and thread to sew on canvas.) I had to set up a long table in the garage, and my husband helped me handle that "beast" while I measured, pinned and sewed. I couldn't have done it without his help!
After the sewing repairs, we still had to patch up the smaller rips and tears; and we continue to do so. The best stuff we have found for patching is called Tear Mender, which we have to order online.
The next thing I decided to re-do in our trailer was our seat cushions. The old ones were not only uncomfy and outdated, but worn as well.
So I found some upholstery fabric at Walmart for $1.50/yard and sewed new covers. I just took off the old covers, unstitched them from the vinyl backing and used them as a pattern to cut new ones. I saved the vinyl backing (with zippers still attached) since they were still in pretty good shape, and sewed on the new fabric to fit the cushions. The hardest ones to do were the bunk ends. But the seat cushions were really not too bad!
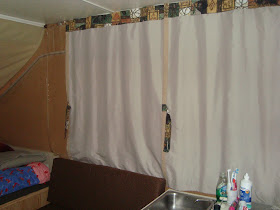
I just recently re-did the curtains since the old ones were moldy and stained. I happended to find some more great fabric at Walmart for a great price. So for very little money and a whole lot of time, I was able to add my personal touch to make the inside of our trailer look and feel warm and cozy for camping!
And I LOVE how it turned out! Next I would like to use my leftover fabric to make coordinating bedspreads for the 2 bunk ends. Maybe next year though. Whew!
My husband found a wonderful website called PopUpPortal.com that helped a lot in our venture. Fixing up this tent trailer has become a hobby for him ever since. He has since replaced the wood, fixed electrical stuff, repainted the whole exterior, rigged up a way to put up our canopy, and several other things. He continues to come up with new improvements every few weeks.
My part in this whole tent trailer project has been lots and lots of sewing!! I spent many, many hours sewing on this thing, so I think it's time for a little "show and tell"!!
After the sewing repairs, we still had to patch up the smaller rips and tears; and we continue to do so. The best stuff we have found for patching is called Tear Mender, which we have to order online.
The next thing I decided to re-do in our trailer was our seat cushions. The old ones were not only uncomfy and outdated, but worn as well.
I just recently re-did the curtains since the old ones were moldy and stained. I happended to find some more great fabric at Walmart for a great price. So for very little money and a whole lot of time, I was able to add my personal touch to make the inside of our trailer look and feel warm and cozy for camping!
And I LOVE how it turned out! Next I would like to use my leftover fabric to make coordinating bedspreads for the 2 bunk ends. Maybe next year though. Whew!
Saturday, August 6, 2011
Dear Parent. . .
I sub a lot in Primary[partly because I'm in the Stake Primary but also I need the blessings so I rarely say no].
As I have taught, the kids say the cutest/profound/funny/well thought insights about the lessons.
I am truly amazed at how much they really know & how tender their little hearts are.
I want their parents to know of the wonderful things that I get to hear. {I know I'm always curious what our kids say when we are not there}.
During the lesson, I wrote down things they said. Then later, I wrote a little note card to the parent. You could give it to the parent or send it to them. (Us parents NEED more FUN mail these days-I know I do).
I know we need a little positive boost every once in a while letting us know we are doin' good in one way or another!
Thursday, August 4, 2011
LEGO Storage
Monday, August 1, 2011
LEGO Table
Our daughter's birthday is today. I'm so excited to surprise her with this LEGO Table I made for her. She is a Lego fanatic. She is always coming up with or asking for ideas to build wonderful Lego creations.
This is her current one-a little small.
This is her new one- a better surface to build. This one measures 40" x 60".
I got this coffee table from the second hand store(goodwill).
I framed out the top board with some molding wood. Secure the top piece to the table with wood glue & brad (finishing)nails -I used my air compressor nail gun. remember to fill the nail holes with wood putty & then sand it.
Its ready to paint.
Painted & sealed(with a spray clear coat).
I used this adhesive( at Home Depot) to put down the Lego boards(found at ToysRus but they are online also). TIP: Don't use this in the heat of the day. I learned the hard way & had to reglue the boards.
I used some Legos to hold the boards together for perfect spacing.
Done. [I would like to add some vinyl lettering with building/Lego words-if I do I'll post the pic]