Wednesday, March 30, 2011
Leading the Music
For this last Monday we used our trusty Music Stick that has been a tradition in our home in leading the music for our Family Night. This fun leading tool (found at the DollarTree dollar store)could be used at home, church, or even at school for a teacher to use!
Monday, March 28, 2011
Friday, March 25, 2011
Family Names {Scrabble} Style
I was so excited when I found this idea. It is so CUTE!
I realized I had this left over door (to an entertainment center) that would serve as the frame.
I used my fabric ruler as a guide to line up all the tiles. Arrange all the tiles to form names of each family member. I found my scrabble letter tiles at the discount store in the game section but you can buy a full set here(amazon.com).
[Fabric Flowers are found on Heather's Etsy Shop]
We are so LUCKY to be apart of a Family.
Party Invite Idea
My daughter found this Party Invite(I made for my BIL who is a twin) in my stash of stuff. I made it many years ago but it turned out so well I just had to keep a copy for myself. This is an invite that would look cute for any party or celebration.
I used the mint containers & spray painted them.
It pulls out into an accordion style paper fold with information on each side.
On the yellow: date, time, instructions on what to bring. On the red: who the party is for, address, contact info, instructions on what to bring.
We are so LUCKY to celebrate special days with friends & family!
Tuesday, March 22, 2011
{Grand}children Photo Tile
I made this for my mom as a Gift to remind her of her beloved grand-children.
I started with a tile(home depot) & a clear magnet photo holder(walmart). I used the thick scrapbooking 3D glue dots to adhere the photo frame (horizontally)to the tile. I added the vinyl title and all the grandkid names.
I love that she will be able to change it easily.
We are so LUCKY to be reminded of our blessings!
Saturday, March 19, 2011
{Lime} Cookies
It's so fun to try new recipes-especially if they are Cookies!
To Make:
Cream together: 1 1/2 cup butter, 1 cup white sugar, 1 (3 oz.) pkg. lime gelatin.
Add: 1 egg, 1 tsp. vanilla & 1 tsp. baking powder-Mix well.
Stir in: 4 cups flour ( I used 2 cups all purpose flour + 2 cups spelt flour). You can roll the dough out & cut it with cookies cutters if you like but I just used a mini ice cream scooper. These cookies hold their shape really well.
Bake at 375 for 10 mins.
It was nice to not have frosting(although it wouldn't hurt) so you could taste the flavor of Lime. Now I wonder what flavor I'll try next. . . . . .
Friday, March 18, 2011
Fun {Games}
Last Night (for St. Patty's Day) we played some Fun Games.
Game 1: Floating Feather
Each player has a green feather. Everyone has to blow the feather upward to keep it floating in the air so it doesn't touch the ground. The person that can keep it up the longest wins. [I did it & its a a lot harder than I thought- the kids beat me every time!] The kids had fun after the game using the feather as a tickle weapon.
Game 2: Coin Throw
I used a muffin tin I had & put "point" values on some paper. Have each player stand a few feet back & throw the green coins(found at Big Lots-on sale) to land inside the muffin cup. We did it so each person could throw 2 to 3 coins with each turn. The first one to 100 points wins.
This game from last year is also fun.
We are so LUCKY to have games to create memories!
Thursday, March 17, 2011
Grabbing for the {GOLD}
HAPPY ST. PATRICK'S DAY!!!
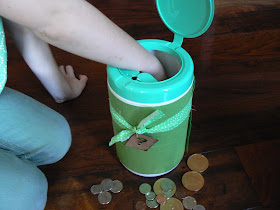
After dinner tonite I'm going to let the children try their luck of Grabbing for the Gold.
I used this Lysol wipe container(washed out really well).
After washing the real money really really well, alternate the real money & chocolate gold coins to fit in your container.
Let the kids put in one hand to grab as much as they can get. But remind them to close their eyes while Grabbing for the Gold. Whatever they grab - they get to KEEP.
We are so LUCKY to have & start new traditions!
Wednesday, March 16, 2011
{Rainbow} Pinwheel Cookies
These cookies are so cute, and perfect for St. Patrick's Day! I've had this recipe for a couple of years (found HERE) but never actually made them until the other day. They were pretty easy and turned out so cool! Thanks Jamie S. from "What's Cooking" blog!
PINWHEEL COOKIES
PINWHEEL COOKIES
3/4 cup butter, softened
3 ounces cream cheese1 cup white sugar
1 egg
1 teaspoon vanilla extract
2 3/4 cups all-purpose flour
1 teaspoon baking powder
1/4 teaspoon salt
assorted colors of paste food coloring
24 lollipop sticks
DIRECTIONS
In a bowl cream butter, cream cheese and sugar until fluffy. Add egg and vanilla; beat until smooth.
In a medium bowl combine flour, baking powder and salt. Add dry ingredients to the creamed mixture. Stir till soft dough forms. Divide dough into fourths. Tint each with a different food color. Wrap in plastic wrap and chill for 2 hours.
Preheat oven to 350 degrees F (175 degrees C). Working with half of each color, shape dough into 3/4 inch balls and for each cookie place 1 pink, 1 green, 1 blue and 1 orange ball together to make 1 large ball. Shape into a 12 inch long roll (like a snake), starting at one end, coil roll to make a 2 3/4 inch round cookie. Place cookies 3 inches apart on lightly greased baking sheet. Carefully insert lollipop sticks into bottoms of cookies.
Bake cookies for 8 minutes or until lightly browned. Cool and store in an airtight container.
I just tried these cookies again, using my favorite sugar cookie recipe for the dough. They turned out really poofy, but still good.
Tuesday, March 15, 2011
Easy Scones with Honey Butter
Since its been raining I thought it sounded good to have some "comfort" food.
When the kids were young I figured out how to make these Easy Scones so I didn't have to wait a few times a year to get them at the fairs. I don't make them too often now because I'll eat them all.
I used these prepared dough.
Let the dough defrost and the 1/2 cup (1 stick) butter soften.
Roll the dough out(Iuse wheat flour to roll with-in my mind it makes them heathlier).
Fry in med-high oil until golden brown on both sides.
Honey Butter:(it took my husband 2 yrs to get this recipe while on his mission in Texas-its been in our family ever since)
Whip the 1/2 cup (1 stick) softened butter [do NOT melt the butter, it will NOT turn out right].
Add 1/2 cup honey(no need to melt it) & whip again.
Get ready to devour the whole plate!
We are so LUCKY to have such great comfort foods!
Monday, March 14, 2011
My Organized Home, Part 2- Meal Prep
My daily dilemma- "What should I make for dinner tonight?" Can you relate? Then when you finally figure it out, you realize you're missing one or two of the ingredients to make that meal? It's the story of my life (when I don't plan ahead).
Making dinner (or any other meal) is my least favorite job as a homemaker!! For me, the worst part of it is choosing just WHAT to make every day. I've done a few different things to help in this area...
A. I've done FREEZER MEALS, (both alone and exchanged in groups with other women).
PROs (for me): cooking/preparing only once a month.
CONs: Still have to choose what to have for dinner everyday, and have to remember to pull out of freezer to thaw.
B. I've done the FRESH MEAL exchange/co-op with friends. *Did this one for a long time and loved it!
PROs (my opinion): Cooking once a week, no freezing, menu is scheduled and we know what we're having, fresh!, side dish included.
CONs: Finding that perfect group (4 of you) with similar size families and similar taste.
C. Right now I'm doing the 4-WEEK MENU method, and I'm really liking it so far. Here's how I'm doing it...
1. On the back of a laminated poster I had, I wrote down (with a dry-erase marker) all the dinners that I know my kids will eat. Then I presented it to my family and let my kids (and husband) vote to veto any they couldn't stand.
2. I then printed off one of my blank Four Week Menu Plans, and penciled in some weekly menu ideas. (I was sure to use a pencil because I had to erase several times to get it just right.)
*This was quite time-consuming, trying to figure out which meals to have in a week. I wanted to make sure we were switching it up enough, while trying to have similar ingredients (or sides) to use 2 nights in a row in 2 different meals. It's kind of tricky!
Click HERE to print my blank menu!
(Click on image below to read my "menu" up close.)
3. Now you can make a binder like Heather's that has all of the recipes for your menu. (Most of my recipes are in my "memory bank", so I haven't taken the time to do this step yet.)
4. Now I needed to make a grocery list to correspond with my menu. So I used my finished menu to guide me while I made a grocery list for each week, (also with consideration for the amounts of each item I would need for the whole week).
*It's a good idea to use a spreadsheet for this. I didn't, so it took me forever!
*I had already made a list of food and non-food staples, so I incorporated my weekly menu items into this list (4 times for the 4 different weeks) and color-coded the weekly items in each one. (I think my list is too big, so I am still making notes on them and changing things as I go, which is an easy fix as long as it's on the computer.)
*Categorizing and alphabetizing also help!
5. I printed out my four lists and put them into sheet protectors to keep in my coupon binder.
*I use plastic sheet protectors instead of laminating them, so I can easily change them up if needs be. Also, so I can check things off with a wipe-off marker without having to reprint the list.
I go grocery shopping every Friday (or Saturday) for the new week, and I have my lists ready and waiting. All I have to do before going to the store is to go through the list and check off all of the items I don't need. This took me a long time to organize, and I still make small changes; but it is saving me so much time and headache in the long run! Especially since I now work outside the home, part-time.
Friday, March 11, 2011
GREEN Pillow
I decided to use the left over sweater I didn't use for the Door Wreath to make this St. Patrick's Day Pillow.
I cut the middle section as big as I could get it.
Trace or write words on the "fabric".
Stitch the beads to form the word.
Remember to tie off after each letter.
All done with the beads.
Put right sides together-stitch & stuff.
How Cute!
We are LUCKY to have pillows for decorations, sleeping on & ultimate fights!